大叫好,我是小易,在智能家居领域从事电子产品的开发工作,目前正在进行信息采集方向的相关工作。
一、功能介绍
通过Wio Terminal扩展接口连接三个传感器,实现将采集的数据通过图表的方式显示出来。
本次项目我们共使用了3个环境监测传感器:
1. 气压监测传感器 BMP280(IIC接口)
2. 环境亮度传感器 LTR390(IIC接口)
3. 空气质量传感器 CCS811(IIC接口)
由于以上传感器均为IIC接口,因此Wio Terminal可通过外部拓展接口的IIC接口连接至各个传感器进行通讯,接线示意图如下所示:
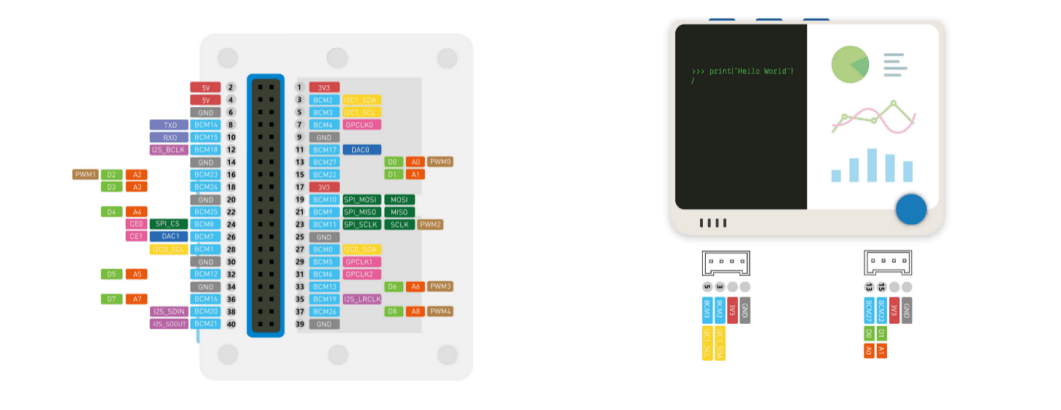
Wio Terminal接线示意图如下所示:
系统整体接线如下:
二、开发环境介绍
Wio Terminal简介
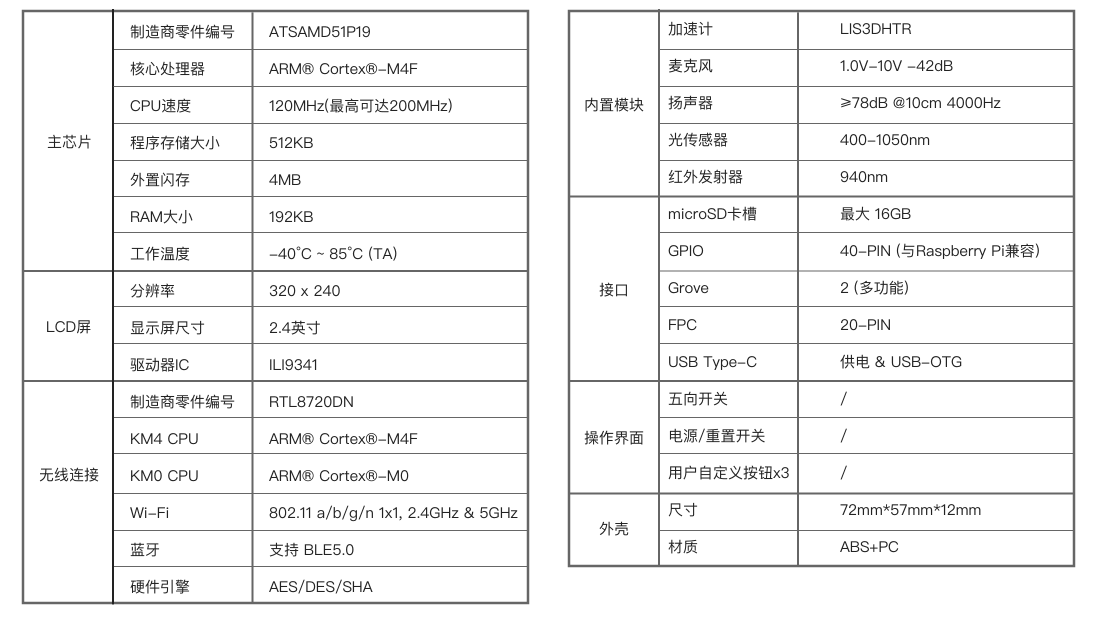
Wio Terminal的运行速度为 120MHz (最高可达200MHz), 4MB 外部闪存和 192KB RAM。
Wio Terminal自身配有一个2.4英寸 LCD屏幕, 板载IMU(LIS3DHTR),麦克风,蜂鸣器,microSD卡槽,光传感器和940nm红外发射器。 除了这些它还有两个用于Grove生态系统的多功能Grove接口和兼容Raspberry pi的40个GPIO引脚,用于支持更多附加组件。


三、代码介绍
3.1 BMP280 气压传感器驱动
Adafruit_BMP280 bme;
void bmp280Init(void)
{
	while (!bme.begin(0x76))
	{ //Init this sensor,True if the init was successful, otherwise false.   初始化传感器,如果初始化成功返回1
		Serial.print("Could not find a valid BMP280 sensor, check wiring!\r\n");
	}
}

uint8_t bmp280Process(double *val, uint8_t type)
{
	float pressure,Temp;

	pressure = bme.readPressure();
	Temp = bme.readTemperature();
	Serial.printf("Pressure:%2.0fPa\nTemperature:%2.0f^C\r\n", pressure,Temp);

  if (type)
  {
    *val = Temp;
  }
  else
  {
	  *val = pressure / 1000;
  }

	return 1;
}
3.2 CCS811 空气质量传感器驱动
DFRobot_CCS811 CCS811;

void ccs811Init(void)
{
	/*Wait for the chip to be initialized completely, and then exit*/
	while(CCS811.begin() != 0)
	{
		Serial.println("failed to init chip, please check if the chip connection is fine");
		delay(1000);
	}
}

double ccs811Process(double *val, uint8_t getType)
{
	uint8_t status = CCS811.checkDataReady();
    if(status)
	{
		if (getType)
		{
			*val = CCS811.getTVOCPPB();
		}
		else
		{
			*val = CCS811.getCO2PPM();
		}

        Serial.print("CO2: ");
        Serial.print(CCS811.getCO2PPM());
        Serial.print("ppm, TVOC: ");
        Serial.print(CCS811.getTVOCPPB());
        Serial.println("ppb");

    } else
	{
        Serial.println("Data is not ready!");
    }
    /*!
     * @brief Set baseline
     * @param get from getBaseline.ino
     */
    CCS811.writeBaseLine(0x447B);

	return status;
}
3.3 LTR390 环境光线传感器驱动
Adafruit_LTR390 ltr = Adafruit_LTR390();
void ltr390Init(void)
{
	while ( ! ltr.begin() )
	{
		Serial.println("Couldn't find LTR sensor!");
		delay(10);
	}
	Serial.println("Found LTR sensor!");

	ltr.setMode(LTR390_MODE_ALS);
	if (ltr.getMode() == LTR390_MODE_ALS)
	{
		Serial.println("In ALS mode");
	}
	else
	{
		Serial.println("In UVS mode");
	}

	ltr.setGain(LTR390_GAIN_3);
	Serial.print("Gain : ");
	switch (ltr.getGain())
	{
		case LTR390_GAIN_1: Serial.println(1); break;
		case LTR390_GAIN_3: Serial.println(3); break;
		case LTR390_GAIN_6: Serial.println(6); break;
		case LTR390_GAIN_9: Serial.println(9); break;
		case LTR390_GAIN_18: Serial.println(18); break;
	}

	ltr.setResolution(LTR390_RESOLUTION_16BIT);
	Serial.print("Resolution : ");
	switch (ltr.getResolution())
	{
		case LTR390_RESOLUTION_13BIT: Serial.println(13); break;
		case LTR390_RESOLUTION_16BIT: Serial.println(16); break;
		case LTR390_RESOLUTION_17BIT: Serial.println(17); break;
		case LTR390_RESOLUTION_18BIT: Serial.println(18); break;
		case LTR390_RESOLUTION_19BIT: Serial.println(19); break;
		case LTR390_RESOLUTION_20BIT: Serial.println(20); break;
	}

	ltr.setThresholds(100, 1000);
//  ltr.configInterrupt(true, LTR390_MODE_ALS);
}

uint8_t ltr390Process(double *val)
{
	uint32_t tempVal = 0;
	float tempVal1 = 0;
	static double ltr390Val = 0;
	uint8_t status = ltr.newDataAvailable();
	if (status)
	{
		tempVal = ltr.readALS();
		tempVal1 = (float)tempVal;
		tempVal1 = 0.6 * tempVal1 / 3 / 0.25;
		ltr390Val = tempVal1;
		Serial.printf("[ALS]src data:%d, Lux:%f\r\n", tempVal, tempVal1);
	}

	*val = tempVal1;

	return status;
}
3.4 绘图程序
#include "seeed_line_chart.h"
#include "line_chart_draw.h"

TFT_eSPI tft;

#define max_size 50 //maximum size of data
doubles lineChartData;
TFT_eSprite spr = TFT_eSprite(&tft);  // Sprite
char *lineChartTitle = "Demo";

void lineChartDataReset(char *title);
void lineChartInit(char *title)
{
    tft.begin();
    spr.createSprite(TFT_HEIGHT,TFT_WIDTH);
    spr.setRotation(3);
    tft.setRotation(3);

	lineChartDataReset(title);
}

void lineChartDataAppend(double inData)
{
    spr.fillSprite(TFT_WHITE);

    if (lineChartData.size() == (max_size+1))
	  {
        lineChartData.pop(); //this is used to remove the first read variable
    }
    lineChartData.push(inData); //read variables and store in data

    //Settings for the line graph title
    auto header =  text(0, 0)
                .value(lineChartTitle)
                .align(center)
                .valign(vcenter)
                .width(tft.width())
                .thickness(2);

    header.height(header.font_height() * 2);
    header.draw(); //Header height is the twice the height of the font

  //Settings for the line graph
    auto content = line_chart(20, header.height()); //(x,y) where the line graph begins
         content
                .height(tft.height() - header.height() * 1.5) //actual height of the line chart
                .width(tft.width() - content.x() * 2) //actual width of the line chart
                .based_on(0.0) //Starting point of y-axis, must be a float
                .show_circle(false) //drawing a cirle at each point, default is on.
                .value(lineChartData) //passing through the data to line graph
                .color(TFT_RED) //Setting the color for the line
                .draw();
    spr.pushSprite(0, 0);
}

void lineChartDataReset(char *title)
{
	lineChartTitle = title;
    spr.fillSprite(TFT_WHITE);

    while (lineChartData.size())
    {
      lineChartData.pop();
    }
	lineChartData.push(0);

    //Settings for the line graph title
    auto header =  text(0, 0)
                .value(lineChartTitle)
                .align(center)
                .valign(vcenter)
                .width(tft.width())
                .thickness(2);

    header.height(header.font_height() * 2);
    header.draw(); //Header height is the twice the height of the font

  //Settings for the line graph
    auto content = line_chart(20, header.height()); //(x,y) where the line graph begins
         content
                .height(tft.height() - header.height() * 1.5) //actual height of the line chart
                .width(tft.width() - content.x() * 2) //actual width of the line chart
                .based_on(0.0) //Starting point of y-axis, must be a float
                .show_circle(false) //drawing a cirle at each point, default is on.
                .value(lineChartData) //passing through the data to line graph
                .color(TFT_RED) //Setting the color for the line
                .draw();
    spr.pushSprite(0, 0);
}
四、功能演示
4.1 环境亮度
4.2 环境气压
4.3 环境温度
4.4 CO2浓度
4.5 TVOC浓度
五、心得体会
本次活动基于seeed的Wio Terminal进行开发,并通过外部拓展端口连接气压、亮度、环境气体检测等传感器,加上Wio Terminal具有十分丰富的例程,也让我们的开发速度以及方案验证节省了不少时间。
十分期待硬禾学堂下期的活动!