1. 资料
- 硬禾-Sipeed M1w Dock Suit K210 开发板
- 芯片:K210 嘉楠官网K210,参数:

- 模块:Sipeed M1/M1W
- 开发板:MAIX Dock
参数: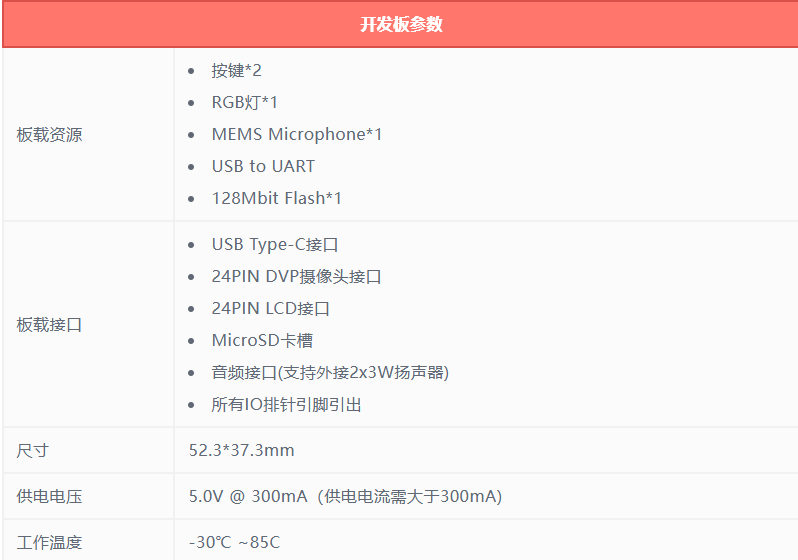
外观: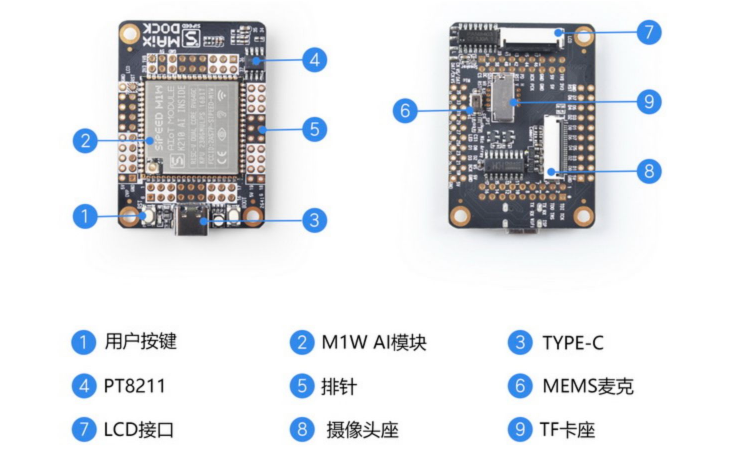
- MAIXPY 文档

maix dock属于maix-1系列,所以去看老文档
MaixPy-v1 - K210 上手(避坑)指南
- IDE: CanMV IDE,CanMV 文档,有一些例程可以直接用
- IDE: MaixPy IDE 安装与使用, 下载地址 MaixPy IDE 报接口错误,去百度盘下载的
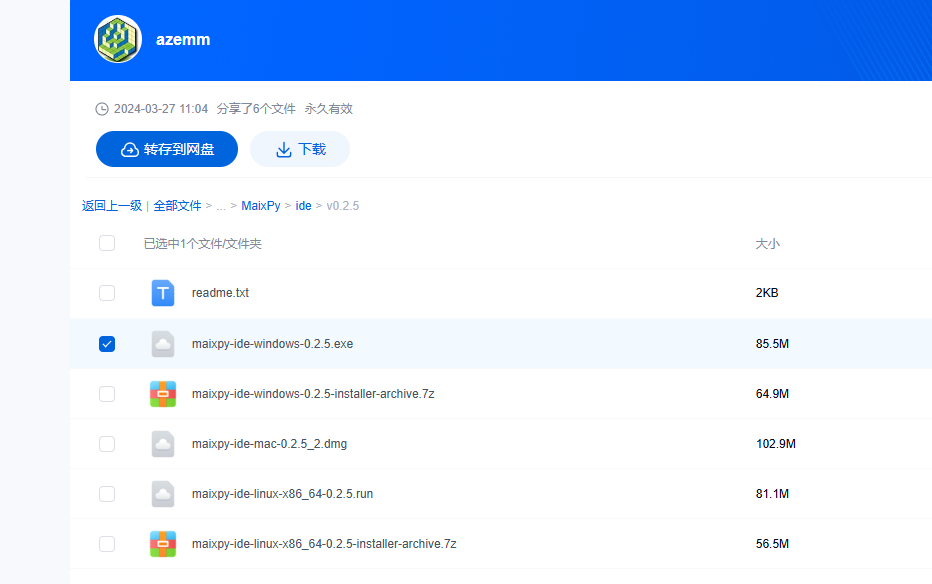
两个ide其实差不多,canmv还能多一些例程,MaixPy可以选择开发板,所以还是用canmv吧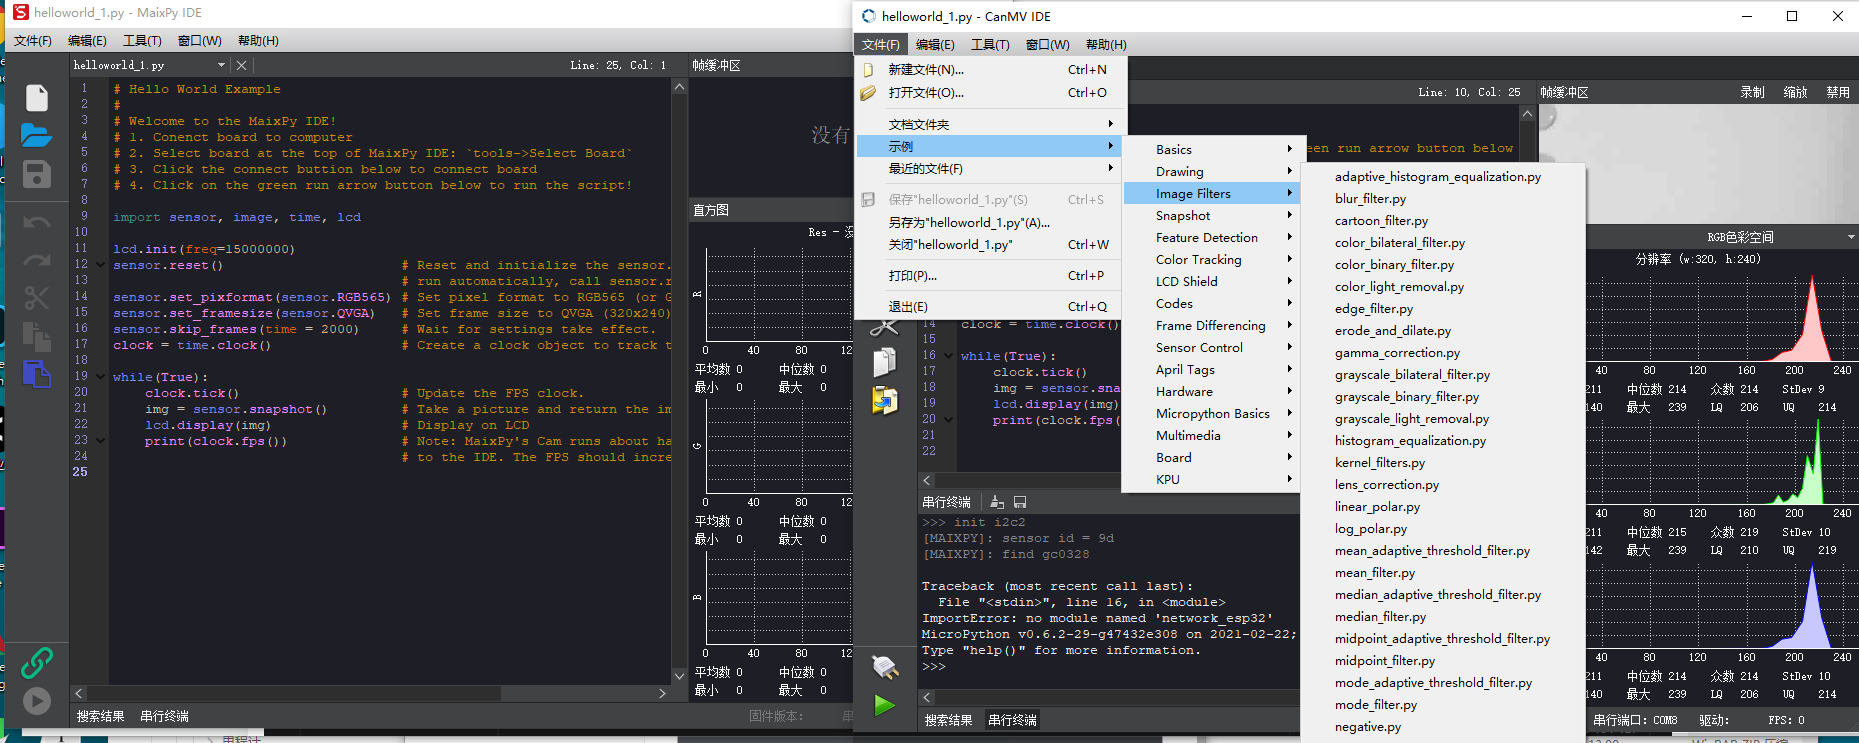
原理图和pdf 文档
- K210 Datasheet
doc/kendryte_K210_datasheet_20180919020633.pdf - K210 电路图
doc/M1w V1.11(schematic).pdf - K210 技术规格书
doc/Sipeed Maix-Dock 规格书 V1.0.pdf - Sipeed Maix 电路图

2. 使用
1. 初次使用
连接串口(115200),复位后能收到消息:
init end
[15:23:54.562]收←◆
__ __ _____ __ __ _____ __ __
| \/ | /\ |_ _| \ \ / / | __ \ \ \ / /
| \ / | / \ | | \ V / | |__) | \ \_/ /
| |\/| | / /\ \ | | > < | ___/ \ /
| | | | / ____ \ _| |_ / . \ | | | |
|_| |_| /_/ \_\ |_____| /_/ \_\ |_| |_|
Official Site : https://www.sipeed.com
Wiki : https://maixpy.sipeed.com
[15:23:54.954]收←◆MicroPython v0.6.2-29-g47432e308 on 2021-02-22; Sipeed_M1 with kendryte-k210
Type "help()" for more information.
>>>
这时候终端是一个python环境,可以运行命令
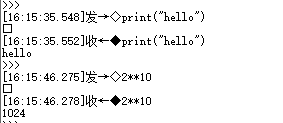
可以进行一些简单测试。
2. 编辑执行、上传文件到开发板
如果要编辑执行、上传、默认运行脚本可以参考下面链接:
编辑并执行文件,上传脚本&模块到开发板,开机自启动脚本。使用MaixPyIDE/CANMV IDE 可以完成这些操作
- 编辑执行文件
使用ide,可以创建编辑执行文件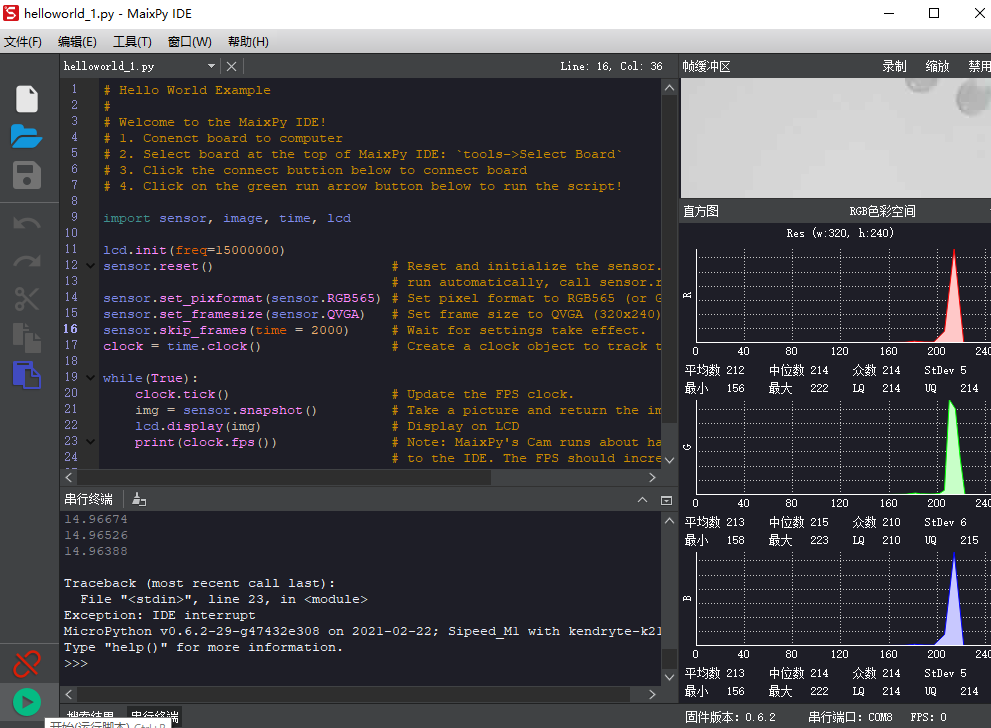
- 上传代码文件到开发板
ide工具命令下可以上传文件,如果保存到boot.py则自动运行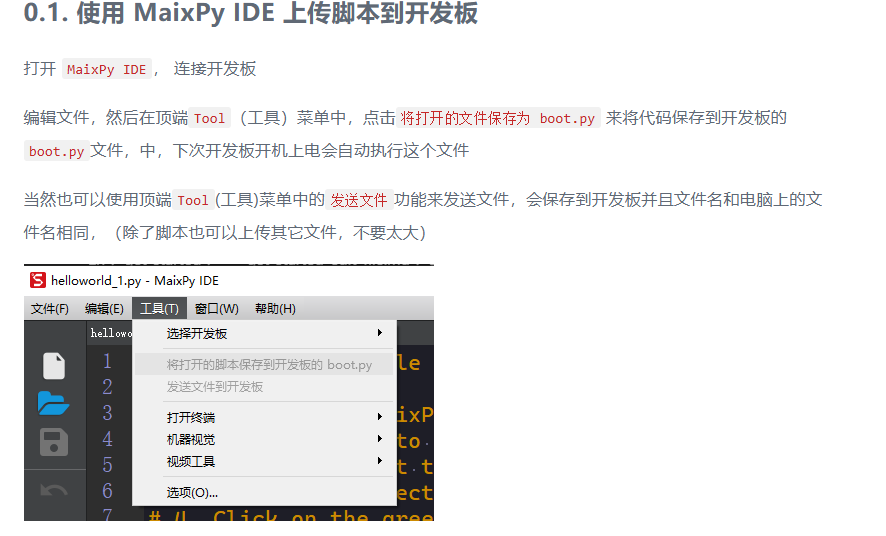
- 开机自运行
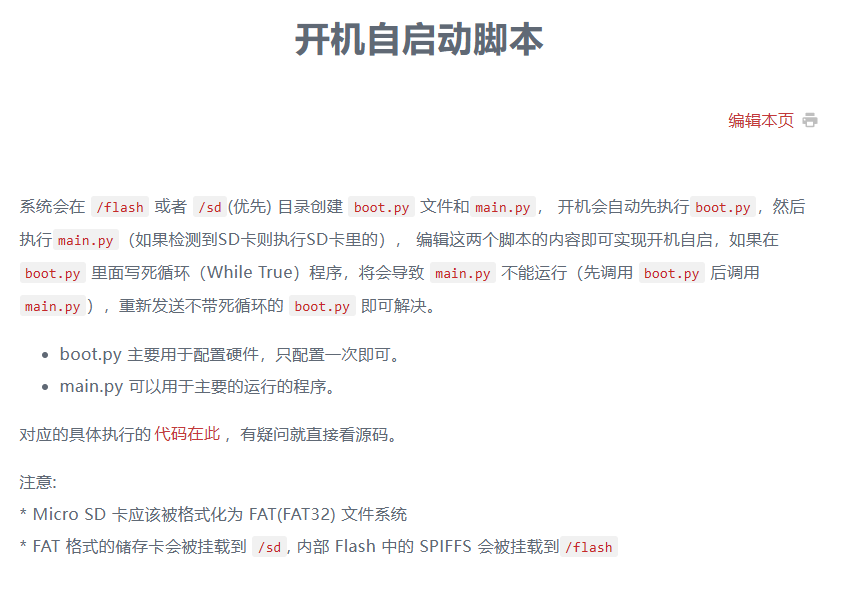
3. 点灯
想点亮LED,用下面的映射不行,其实不应该不行啊,用的引脚
from fpioa_manager import fm
from Maix import GPIO
io_led_g = 12
fm.register(io_led_g, fm.fpioa.GPIO0)
io_led_r = 13
fm.register(io_led_r, fm.fpioa.GPIO1)
io_led_b = 14
fm.register(io_led_b, fm.fpioa.GPIO2)
led_g=GPIO(GPIO.GPIO0, GPIO.OUT)
led_r=GPIO(GPIO.GPIO1, GPIO.OUT)
led_b=GPIO(GPIO.GPIO2, GPIO.OUT)
led_g.value(1)
led_r.value(1)
led_b.value(0)
发现需要配置引脚,config_maix_dock.py 里面的引脚和原理图不符合,而且写文件放到了异常中
原理图引脚:G12 R13 B14
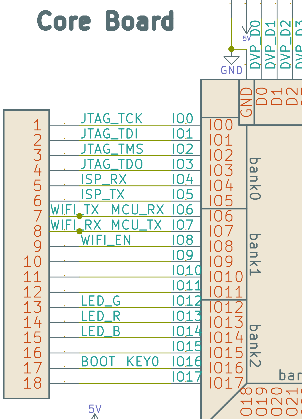
配置引脚
import json
config = {
"type": "dock",
"board_info": {
'BOOT_KEY': 16,
'LED_R': 14,
'LED_G': 13,
'LED_B': 12,
'WIFI_TX': 6,
'WIFI_RX': 7,
'WIFI_EN': 8,
'MIC0_WS': 30,
'MIC0_DATA': 20,
'MIC0_BCK': 32,
'I2S_WS': 33,
'I2S_DA': 34,
'I2S_BCK': 35,
}
}
cfg = json.dumps(config)
print(cfg)
try:
with open('/flash/config.json', 'rb') as f:
tmp = json.loads(f.read())
print(tmp)
if tmp["type"] != config["type"]:
raise Exception('config.json no exist')
except Exception as e:
with open('/flash/config.json', "w") as f:
f.write(cfg)
import machine
machine.reset()
修改一下
import json
config = {
"type": "dock",
"board_info": {
'BOOT_KEY': 16,
'LED_R': 13,
'LED_G': 12,
'LED_B': 14,
'WIFI_TX': 6,
'WIFI_RX': 7,
'WIFI_EN': 8,
'MIC0_WS': 30,
'MIC0_DATA': 20,
'MIC0_BCK': 32,
'I2S_WS': 33,
'I2S_DA': 34,
'I2S_BCK': 35,
}
}
cfg = json.dumps(config)
print(cfg)
try:
with open('/flash/config.json', 'rb') as f:
tmp = json.loads(f.read())
print(tmp)
if tmp["type"] != config["type"]:
raise Exception('config.json no exist')
print("write")
with open('/flash/config.json', "w") as f:
f.write(cfg)
print("reset")
import machine
machine.reset()
except Exception as e:
print(e)
再点红灯测试
from fpioa_manager import fm
from board import board_info
from Maix import GPIO
print(board_info.LED_R, board_info.LED_R == 13)
fm.register(board_info.LED_R, fm.fpioa.GPIO1)
led_r=GPIO(GPIO.GPIO1, GPIO.OUT)
led_r.value(0)
发现还是绿色的灯(对应13号引脚),回到起点,回想一下用引脚号直接映射的应该也没错,那结果只有一个:原理图是错的
再用下面的代码配置原始引脚:
import json
config = {
"type": "dock",
"board_info": {
'BOOT_KEY': 16,
'LED_R': 14,
'LED_G': 13,
'LED_B': 12,
'WIFI_TX': 6,
'WIFI_RX': 7,
'WIFI_EN': 8,
'MIC0_WS': 30,
'MIC0_DATA': 20,
'MIC0_BCK': 32,
'I2S_WS': 33,
'I2S_DA': 34,
'I2S_BCK': 35,
}
}
cfg = json.dumps(config)
print(cfg)
try:
with open('/flash/config.json', 'rb') as f:
tmp = json.loads(f.read())
print(tmp)
if tmp["type"] != config["type"]:
raise Exception('config.json no exist')
print("write")
with open('/flash/config.json', "w") as f:
f.write(cfg)
print("reset")
import machine
machine.reset()
except Exception as e:
print(e)
也可以用board_info.load来写配置。
点灯
from fpioa_manager import fm
from board import board_info
from Maix import GPIO
fm.register(board_info.LED_G, fm.fpioa.GPIO0)
fm.register(board_info.LED_R, fm.fpioa.GPIO1)
fm.register(board_info.LED_B, fm.fpioa.GPIO2)
led_g=GPIO(GPIO.GPIO0, GPIO.OUT)
led_r=GPIO(GPIO.GPIO1, GPIO.OUT)
led_b=GPIO(GPIO.GPIO2, GPIO.OUT)
led_g.value(0)
led_r.value(0)
led_b.value(0)
4. 系统功能规划
系统架构图

流程为:在设备中,从摄像头采集图片,连接WiFi,通过udp发送数据到服务端,服务端py脚本调用llm平台应用,获取图片描述信息,通过udp发送给设备,设备显示信息到屏幕。
下面一步步增加并验证功能。
5. LLM
1)创建应用
想通过应用来调用,发现应用图片参数不好传。只能用模型api直接调用(有图像处理的)
2)测试图片调用
#coding=utf-8
import os
from openai import OpenAI
client = OpenAI(
# 若没有配置环境变量,请用百炼API Key将下行替换为:api_key="sk-xxx",
api_key="sk-xxx",
base_url="https://dashscope.aliyuncs.com/compatible-mode/v1",
)
completion = client.chat.completions.create(
model="qwen-vl-plus", # 此处以qwen-vl-plus为例,可按需更换模型名称。模型列表:https://help.aliyun.com/zh/model-studio/getting-started/models
messages=[
{"role": "user","content": [
{"type": "text","text": "你是一个图片助手,用户给你输入一张图片,你用简短的语言来描述图片的物体,以特殊词“bingo!”开头,不超过20个字。 如果没输入图片,你就说“主人,请输入图片”"},
{"type": "image_url",
"image_url": {"url": "https://dashscope.oss-cn-beijing.aliyuncs.com/images/dog_and_girl.jpeg"}}
]}]
)
print(completion.model_dump_json())
{"id":"chatcmpl-297e3189-7387-9ed6-b3fd-90d5096a56e8","choices":[{"finish_reason":"stop","index":0,"logprobs":null,"message":{"content":"bingo! 女孩和狗在沙滩上互动,夕阳为背景。","refusal":null,"role":"assistant","annotations":null,"audio":null,"function_call":null,"tool_calls":null}}],"created":1742133824,"model":"qwen-vl-plus","object":"chat.completion","service_tier":null,"system_fingerprint":null,"usage":{"completion_tokens":19,"prompt_tokens":1323,"total_tokens":1342,"completion_tokens_details":null,"prompt_tokens_details":null}}
3)python静态图片服务
llm需要传入网络图片,需要先上传图片并获取地址
import os
import uuid
from flask import Flask, request, jsonify
# 配置服务器
UPLOAD_FOLDER = "static/uploads" # 图片存储目录
BASE_URL = "http://xx.xx.xx.xx:9001/" # 服务器访问地址
# 创建目录(如果不存在)
os.makedirs(UPLOAD_FOLDER, exist_ok=True)
# 初始化 Flask
app = Flask(__name__)
@app.route("/upload", methods=["POST"])
def upload_image():
"""接收图片并存储到静态目录"""
if "file" not in request.files:
return jsonify({"error": "No file part"}), 400
file = request.files["file"]
if file.filename == "":
return jsonify({"error": "No selected file"}), 400
# 生成唯一文件名
filename = f"{uuid.uuid4().hex}.jpg"
file_path = os.path.join(UPLOAD_FOLDER, filename)
# 保存图片
file.save(file_path)
# 返回访问 URL
file_url = f"{BASE_URL}{file_path}"
return jsonify({"url": file_url})
if __name__ == "__main__":
app.run(host="0.0.0.0", port=9001, debug=True)
测试成功,http://xx.xx.xx.xx:9001/upload
4)服务端程序
使用tcp连接,接收图片(带协议),解析图片,上传图片,调用LLM获取结果,发送给客户端。
协议为:帧头(0XAB,0XCD),长度(4字节数据长度,小端),数据...,校验(1位异或)
5)客户端程序
嵌入式开个小节写
6. 嵌入式软件
1)wifi连接
wifi文件参考:
ESP82XX 的 AT 固件,network_espat.py
# This file is part of MaixPY
# Copyright (c) sipeed.com
#
# Licensed under the MIT license:
# http://www.opensource.org/licenses/mit-license.php
#
import time, network
from Maix import GPIO
from machine import UART
from fpioa_manager import fm
from board import board_info
class wifi():
__is_m1w__ = True
uart = None
eb = None
nic = None
def init():
if __class__.__is_m1w__:
fm.register(0, fm.fpioa.GPIOHS1, force=True)
M1wPower=GPIO(GPIO.GPIOHS1, GPIO.OUT)
M1wPower.value(0) # b'\r\n ets Jan 8 2013,rst cause:1, boot mode:(7,6)\r\n\r\nwaiting for host\r\n'
fm.register(board_info.WIFI_EN, fm.fpioa.GPIOHS0) # board_info.WIFI_EN == IO 8
__class__.en = GPIO(GPIO.GPIOHS0,GPIO.OUT)
fm.register(board_info.WIFI_RX,fm.fpioa.UART2_TX) # board_info.WIFI_RX == IO 7
fm.register(board_info.WIFI_TX,fm.fpioa.UART2_RX) # board_info.WIFI_TX == IO 6
__class__.uart = UART(UART.UART2, 115200, timeout=1000, read_buf_len=8192)
def enable(en):
__class__.en.value(en)
def _at_cmd(cmd="AT\r\n", resp="OK\r\n", timeout=20):
__class__.uart.write(cmd) # "AT+GMR\r\n"
time.sleep_ms(timeout)
tmp = __class__.uart.read()
# print(tmp)
if tmp and tmp.endswith(resp):
return True
return False
def at_cmd(cmd="AT\r\n", timeout=20):
__class__.uart.write(cmd) # "AT+GMR\r\n"
time.sleep_ms(timeout)
tmp = __class__.uart.read()
return tmp
def reset(force=False, reply=5):
if force == False and __class__.isconnected():
return True
__class__.init()
for i in range(reply):
print('reset...')
__class__.enable(False)
time.sleep_ms(50)
__class__.enable(True)
time.sleep_ms(500) # at start > 500ms
if __class__._at_cmd(timeout=500):
break
__class__._at_cmd()
__class__._at_cmd('AT+UART_CUR=921600,8,1,0,0\r\n', "OK\r\n")
__class__.uart = UART(UART.UART2, 921600, timeout=1000, read_buf_len=10240)
# important! baudrate too low or read_buf_len too small will loose data
#print(__class__._at_cmd())
try:
__class__.nic = network.ESP8285(__class__.uart)
time.sleep_ms(500) # wait at ready to connect
except Exception as e:
print(e)
return False
return True
def connect(ssid="wifi_name", pasw="pass_word"):
if __class__.nic != None:
return __class__.nic.connect(ssid, pasw)
def ifconfig(): # should check ip != 0.0.0.0
if __class__.nic != None:
return __class__.nic.ifconfig()
def isconnected():
if __class__.nic != None:
return __class__.nic.isconnected()
return False
if __name__ == "__main__":
# It is recommended to callas a class library (upload network_espat.py)
# from network_espat import wifi
SSID = "Sipeed_2.4G"
PASW = "xxxxxxxx"
def check_wifi_net(reply=5):
if wifi.isconnected() != True:
for i in range(reply):
try:
wifi.reset()
print('try AT connect wifi...', wifi._at_cmd())
wifi.connect(SSID, PASW)
if wifi.isconnected():
break
except Exception as e:
print(e)
return wifi.isconnected()
if wifi.isconnected() == False:
check_wifi_net()
print('network state:', wifi.isconnected(), wifi.ifconfig())
# The network is no longer configured repeatedly
import socket
sock = socket.socket()
# your send or recv
# see other demo_socket_tcp.py / udp / http / mqtt
sock.close()
'''ouput
>>>
raw REPL; CTRL-B to exit
>OK
[Warning] function is used by fm.fpioa.GPIOHS1(pin:17)
[Warning] function is used by fm.fpioa.GPIOHS0(pin:16)
reset...
try AT connect wifi... True
could not connect to ssid=Sipeed_2.4G
reset...
try AT connect wifi... True
network state: True ('192.168.0.165', '255.255.255.0', '192.168.0.1', '0', '0', 'b0:b9:8a:5b:be:7f', 'Sipeed_2.4G')
>
MicroPython v0.5.1-136-g039f72b6c-dirty on 2020-11-18; Sipeed_M1 with kendryte-k210
Type "help()" for more information.
>>>
>>>
>>>
raw REPL; CTRL-B to exit
>OK
network state: True ('192.168.0.165', '255.255.255.0', '192.168.0.1', '0', '0', 'b0:b9:8a:5b:be:7f', 'Sipeed_2.4G')
>
'''
2)使用网络
参考:如何使用 Socket 网络编程,
wifi连接后就有了网络能力,开始tcp连接
# This file is part of MaixPY
# Copyright (c) sipeed.com
#
# Licensed under the MIT license:
# http://www.opensource.org/licenses/mit-license.php
#
#network_wiznet5k()
SSID = "XM-AE86"
PASW = "xxxxxx"
import time, network
from Maix import GPIO
from machine import UART
from fpioa_manager import fm
from board import board_info
class wifi():
__is_m1w__ = True
uart = None
eb = None
nic = None
def init():
if __class__.__is_m1w__:
fm.register(0, fm.fpioa.GPIOHS1, force=True)
M1wPower=GPIO(GPIO.GPIOHS1, GPIO.OUT)
M1wPower.value(0) # b'\r\n ets Jan 8 2013,rst cause:1, boot mode:(7,6)\r\n\r\nwaiting for host\r\n'
fm.register(board_info.WIFI_EN, fm.fpioa.GPIOHS0) # board_info.WIFI_EN == IO 8
__class__.en = GPIO(GPIO.GPIOHS0,GPIO.OUT)
fm.register(board_info.WIFI_RX,fm.fpioa.UART2_TX) # board_info.WIFI_RX == IO 7
fm.register(board_info.WIFI_TX,fm.fpioa.UART2_RX) # board_info.WIFI_TX == IO 6
__class__.uart = UART(UART.UART2, 115200, timeout=1000, read_buf_len=8192)
def enable(en):
__class__.en.value(en)
def _at_cmd(cmd="AT\r\n", resp="OK\r\n", timeout=20):
__class__.uart.write(cmd) # "AT+GMR\r\n"
time.sleep_ms(timeout)
tmp = __class__.uart.read()
# print(tmp)
if tmp and tmp.endswith(resp):
return True
return False
def at_cmd(cmd="AT\r\n", timeout=20):
__class__.uart.write(cmd) # "AT+GMR\r\n"
time.sleep_ms(timeout)
tmp = __class__.uart.read()
return tmp
def reset(force=False, reply=5):
if force == False and __class__.isconnected():
return True
__class__.init()
for i in range(reply):
print('reset...')
__class__.enable(False)
time.sleep_ms(50)
__class__.enable(True)
time.sleep_ms(500) # at start > 500ms
if __class__._at_cmd(timeout=500):
break
__class__._at_cmd()
__class__._at_cmd('AT+UART_CUR=921600,8,1,0,0\r\n', "OK\r\n")
__class__.uart = UART(UART.UART2, 921600, timeout=1000, read_buf_len=10240)
# important! baudrate too low or read_buf_len too small will loose data
#print(__class__._at_cmd())
try:
__class__.nic = network.ESP8285(__class__.uart)
time.sleep_ms(500) # wait at ready to connect
except Exception as e:
print(e)
return False
return True
def connect(ssid="wifi_name", pasw="pass_word"):
if __class__.nic != None:
return __class__.nic.connect(ssid, pasw)
def ifconfig(): # should check ip != 0.0.0.0
if __class__.nic != None:
return __class__.nic.ifconfig()
def isconnected():
if __class__.nic != None:
return __class__.nic.isconnected()
return False
def enable_espat():
if wifi.isconnected() == False:
for i in range(5):
try:
# Running within 3 seconds of power-up can cause an SD load error
# wifi.reset(is_hard=False)
wifi.reset()
print('try AT connect wifi...')
wifi.connect(SSID, PASW)
if wifi.isconnected():
break
except Exception as e:
print(e)
print('network state:', wifi.isconnected(), wifi.ifconfig())
#enable_espat()
def check_wifi_net(reply=5):
if wifi.isconnected() != True:
for i in range(reply):
try:
wifi.reset()
print('try AT connect wifi...', wifi._at_cmd())
wifi.connect(SSID, PASW)
if wifi.isconnected():
break
except Exception as e:
print(e)
return wifi.isconnected()
if wifi.isconnected() == False:
check_wifi_net()
print('network state:', wifi.isconnected(), wifi.ifconfig())
import socket
ADDR = ("xx.xx.xx.xx", 60000)
sock = socket.socket()
sock.connect(ADDR)
sock.settimeout(1)
while 1:
sock.send("hello\n")
#data = sock.recv(10) # old maxipy have bug (recv timeout no return last data)
#print(data) # fix
try:
data = b""
while True:
tmp = sock.recv(1)
print(tmp)
if len(tmp) == 0:
raise Exception('timeout or disconnected')
data += tmp
except Exception as e:
print("rcv:", len(data), data)
#time.sleep(2)
sock.close()
3)屏幕
参考
lcd 屏幕显示驱动,lcd库函数列表
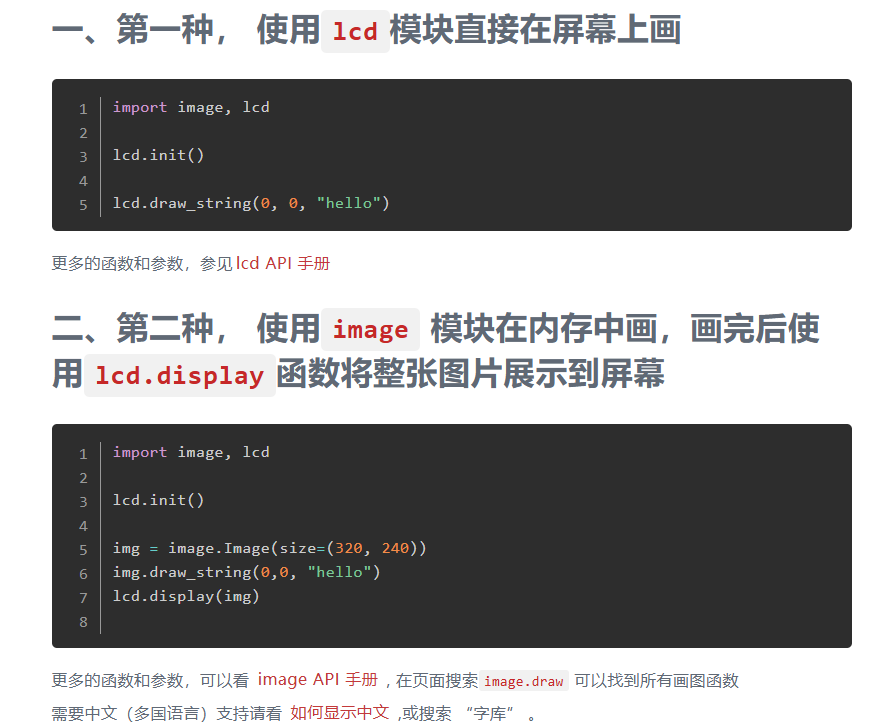
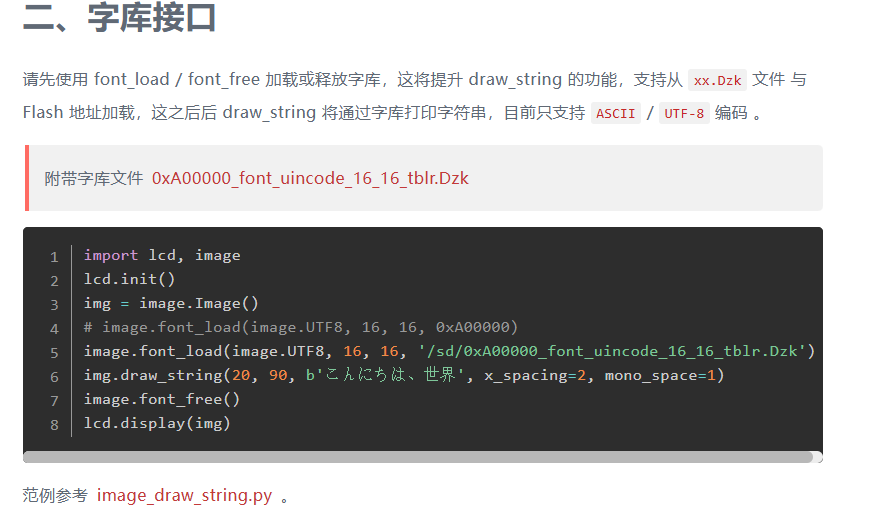
综上,使用方法:
想要有汉字,需要使用字库文件(2MB),板载flash只剩余了3MB,还是放到sd卡上。
sd卡使用:将SD卡格式化为FAT32格式,将字库文件放到根目录;板子断电,插上sd卡后上电,即可使用sd卡上的文件。
代码如下,用的基本例程(显示摄像头采集的画面到lcd上,加中文注释的两句代码是新增
# Hello World Example
#
# Welcome to the MaixPy IDE!
# 1. Conenct board to computer
# 2. Select board at the top of MaixPy IDE: `tools->Select Board`
# 3. Click the connect buttion below to connect board
# 4. Click on the green run arrow button below to run the script!
import sensor, image, time, lcd
lcd.init(freq=15000000)
sensor.reset() # Reset and initialize the sensor. It will
# run automatically, call sensor.run(0) to stop
sensor.set_pixformat(sensor.RGB565) # Set pixel format to RGB565 (or GRAYSCALE)
sensor.set_framesize(sensor.QVGA) # Set frame size to QVGA (320x240)
sensor.skip_frames(time = 2000) # Wait for settings take effect.
clock = time.clock() # Create a clock object to track the FPS.
# 导入字库
image.font_load(image.UTF8, 16, 16, '/sd/0xA00000_font_uincode_16_16_tblr.Dzk')
while(True):
clock.tick() # Update the FPS clock.
img = sensor.snapshot() # Take a picture and return the image.
# 图片上加文字
img.draw_string(100,100, "你好", x_spacing=2, mono_space=1, color=(0,128,0), scale=2)
lcd.display(img) # Display on LCD
print(clock.fps()) # Note: MaixPy's Cam runs about half as fast when connected
# to the IDE. The FPS should increase once disconnected.
4)图像处理
需要将图片处理为jpg格式的字节数组
参考: 基本图像变换 和 常用操作
# 原图压缩jpeg,转字节
img2 = img.compressed(quality=20)
jpeg_bytes = img2.to_bytes()
print("bytes length: %d bytes[0]: %x%x" %(len(jpeg_bytes), jpeg_bytes[0], jpeg_bytes[1]))
输出"ffd8",为jpeg格式头。
7. 代码
服务器端
server.py 开启tcp服务器,处理图片协议,调用LLM,返回结果
# coding=utf-8
import socket
import base64
import json
import os
import requests
from openai import OpenAI
import struct
# 配置 LLM API
API_KEY = "sk-xxx" # 请替换为你的 DashScope API Key
BASE_URL = "https://dashscope.aliyuncs.com/compatible-mode/v1"
MODEL_NAME = "qwen-vl-plus" # 选择的 LLM 模型
# TCP 服务器配置
HOST = "0.0.0.0"
PORT = 9002
BUFFER_SIZE = 1024 * 1024 # 1MB 缓冲区
# Flask 服务器上传 API
UPLOAD_URL = "http://xx.xx.xx.xx:9001/upload"
# 初始化 OpenAI 客户端
client = OpenAI(api_key=API_KEY, base_url=BASE_URL)
def upload_image(image_data):
"""上传图片到 Flask 服务器"""
files = {"file": ("image.jpg", image_data, "image/jpeg")}
response = requests.post(UPLOAD_URL, files=files)
if response.status_code == 200:
return response.json().get("url")
else:
print("图片上传失败:", response.text)
return None
def call_llm(image_url):
"""调用 LLM 处理图片"""
try:
completion = client.chat.completions.create(
model=MODEL_NAME,
messages=[
{
"role": "user",
"content": [
{"type": "text", "text": "你是一个图片助手,用户给你输入一张图片,你用简短的语言来描述图片的物体,以特殊词“bingo!”开头,除特殊词外不能超过10个字,内容中不需要出现“图中”等字眼,只描述物体就行,比如“一个苹果”。 如果没输入图片,你就说“主人,请输入图片”"},
{"type": "image_url", "image_url": {"url":image_url}}
]
}
]
)
# 解析 LLM 响应
response_data = json.loads(completion.model_dump_json())
text_result = response_data.get("choices", [{}])[0].get("message", {}).get("content", "LLM 解析失败")
return text_result
except Exception as e:
return f"LLM 调用失败: {str(e)}"
def xor_checksum(data):
"""计算 XOR 校验"""
checksum = 0
for byte in data:
checksum ^= byte
return checksum
def handle_client(conn, addr):
"""处理 TCP 连接"""
print(f"连接来自: {addr}")
try:
# 超时断开
conn.settimeout(5)
# 解析协议:帧头(0XAB,0XCD),长度(4字节数据长度,小端),数据...,校验(1位异或)
# 帧头 AB CD
header = conn.recv(2)
if header!=b'\xAB\xCD':
print("协议解析:帧头错误")
conn.sendall(b"ERROR: Invaild header")
return
# 长度
data_len_bs = conn.recv(4)
if not data_len_bs:
print("协议解析:长度错误")
conn.sendall(b"ERROR: Invaild len")
return
data_len = struct.unpack("<I", data_len_bs)[0]
if data_len < 1:
print("协议解析:数据为空")
conn.sendall(b"ERROR: Empty data")
return
print(f"接收数据长度: {data_len} 字节")
# 数据
data = b""
while len(data) < data_len:
chunk = conn.recv(min(BUFFER_SIZE, data_len-len(data)))
if not chunk:
break # 连接关闭,停止接收
data+=chunk
if len(data) != data_len:
print("协议解析:数据不完整")
conn.sendall(b"ERROR: Incomplete data")
return
# 校验
check_byte = conn.recv(1)
check = struct.unpack("<B", check_byte)[0]
if xor_checksum(data)!=check:
print("协议解析:校验失败 {} {}".format(xor_checksum(data), check))
conn.sendall(b"ERROR: Check mismatch")
return
# 上传图片
print("upload image")
image_url = upload_image(data)
if not image_url:
conn.sendall(b"ERROR: Image upload failed")
return
print("图片 URL:", image_url)
# 调用 LLM
llm_result = call_llm(image_url)
print("LLM 结果:", llm_result)
# 返回结果
conn.sendall(llm_result.encode())
except socket.timeout:
# 超时断开
print("conn timeout")
conn.sendall(b"ERROR: timeout")
except Exception as e:
print("处理失败:", e)
conn.sendall(b"ERROR: Server error")
finally:
conn.close()
def start_server():
"""启动 TCP 服务器"""
with socket.socket(socket.AF_INET, socket.SOCK_STREAM) as server:
server.bind((HOST, PORT))
server.listen(5)
print(f"TCP 服务器已启动,监听端口 {PORT}...")
while True:
conn, addr = server.accept()
conn.settimeout(5)
print(f"连接来自: {addr}")
handle_client(conn,addr)
if __name__ == "__main__":
start_server()
static.py 静态图片服务,上传和访问图片
import os
import uuid
from flask import Flask, request, jsonify
# 配置服务器
UPLOAD_FOLDER = "static/uploads" # 图片存储目录
BASE_URL = "http://127.0.0.1:9001/" # 服务器访问地址
# 创建目录(如果不存在)
os.makedirs(UPLOAD_FOLDER, exist_ok=True)
# 初始化 Flask
app = Flask(__name__)
@app.route("/upload", methods=["POST"])
def upload_image():
"""接收图片并存储到静态目录"""
if "file" not in request.files:
return jsonify({"error": "No file part"}), 400
file = request.files["file"]
if file.filename == "":
return jsonify({"error": "No selected file"}), 400
# 生成唯一文件名
filename = f"{uuid.uuid4().hex}.jpg"
file_path = os.path.join(UPLOAD_FOLDER, filename)
# 保存图片
file.save(file_path)
# 返回访问 URL
file_url = f"{BASE_URL}{file_path}"
return jsonify({"url": file_url})
if __name__ == "__main__":
app.run(host="0.0.0.0", port=5000, debug=True)
嵌入式:
# coding=utf-8
# This file is part of MaixPY
# Copyright (c) sipeed.com
#
# Licensed under the MIT license:
# http://www.opensource.org/licenses/mit-license.php
#
SSID = "XM-AE86"
PASW = "xxxxxx"
import time, network
from Maix import GPIO
from machine import UART
from fpioa_manager import fm
from board import board_info
from sys import exit
import socket
import sensor, image, lcd
import struct
class wifi():
__is_m1w__ = True
uart = None
eb = None
nic = None
def init():
if __class__.__is_m1w__:
fm.register(0, fm.fpioa.GPIOHS1, force=True)
M1wPower=GPIO(GPIO.GPIOHS1, GPIO.OUT)
M1wPower.value(0) # b'\r\n ets Jan 8 2013,rst cause:1, boot mode:(7,6)\r\n\r\nwaiting for host\r\n'
fm.register(board_info.WIFI_EN, fm.fpioa.GPIOHS0) # board_info.WIFI_EN == IO 8
__class__.en = GPIO(GPIO.GPIOHS0,GPIO.OUT)
fm.register(board_info.WIFI_RX,fm.fpioa.UART2_TX) # board_info.WIFI_RX == IO 7
fm.register(board_info.WIFI_TX,fm.fpioa.UART2_RX) # board_info.WIFI_TX == IO 6
__class__.uart = UART(UART.UART2, 115200, timeout=1000, read_buf_len=8192)
def enable(en):
__class__.en.value(en)
def _at_cmd(cmd="AT\r\n", resp="OK\r\n", timeout=20):
__class__.uart.write(cmd) # "AT+GMR\r\n"
time.sleep_ms(timeout)
tmp = __class__.uart.read()
# print(tmp)
if tmp and tmp.endswith(resp):
return True
return False
def at_cmd(cmd="AT\r\n", timeout=20):
__class__.uart.write(cmd) # "AT+GMR\r\n"
time.sleep_ms(timeout)
tmp = __class__.uart.read()
return tmp
def reset(force=False, reply=5):
if force == False and __class__.isconnected():
return True
__class__.init()
for i in range(reply):
print('reset...')
__class__.enable(False)
time.sleep_ms(50)
__class__.enable(True)
time.sleep_ms(500) # at start > 500ms
if __class__._at_cmd(timeout=500):
break
__class__._at_cmd()
__class__._at_cmd('AT+UART_CUR=921600,8,1,0,0\r\n', "OK\r\n")
__class__.uart = UART(UART.UART2, 921600, timeout=1000, read_buf_len=10240)
# important! baudrate too low or read_buf_len too small will loose data
#print(__class__._at_cmd())
try:
__class__.nic = network.ESP8285(__class__.uart)
time.sleep_ms(500) # wait at ready to connect
except Exception as e:
print(e)
return False
return True
def connect(ssid="wifi_name", pasw="pass_word"):
if __class__.nic != None:
return __class__.nic.connect(ssid, pasw)
def ifconfig(): # should check ip != 0.0.0.0
if __class__.nic != None:
return __class__.nic.ifconfig()
def isconnected():
if __class__.nic != None:
return __class__.nic.isconnected()
return False
# 连接wifi
def enable_espat(reply=5):
if wifi.isconnected() != True:
for i in range(reply):
try:
wifi.reset()
print('try AT connect wifi...', wifi._at_cmd())
wifi.connect(SSID, PASW)
if wifi.isconnected():
break
except Exception as e:
print(e)
return wifi.isconnected()
def xor_checksum(data):
"""计算 XOR 校验"""
checksum = 0
for byte in data:
checksum ^= byte
return checksum
# 发送图片
ADDR = ("39.103.59.12", 9002)
def send_image(image_data):
'''
with open(image_path, "rb") as f:
image_data = f.read()
'''
img_size = len(image_data)
print("发送图片大小: {} 字节".format(img_size))
client = socket.socket()
client.connect(ADDR)
client.settimeout(1)
# 发送帧头
client.send(b"\xAB\xCD")
# 发送 4 字节的大小
client.send(struct.pack("<I", img_size))
# 发送图片数据
client.send(image_data)
# 校验
cs = xor_checksum(image_data)
print("checksum=", cs)
client.send(struct.pack("<B", cs))
# 等待服务器返回 LLM 结果
response = client.recv(1024)
llm_result = response.decode()
print("LLM 结果:", llm_result)
if llm_result.startswith("bingo!"):
return llm_result[7:]
return ""
# lcd init
def lcd_init():
lcd.init(freq=15000000)
sensor.reset() # Reset and initialize the sensor. It will
# run automatically, call sensor.run(0) to stop
sensor.set_pixformat(sensor.RGB565) # Set pixel format to RGB565 (or GRAYSCALE)
sensor.set_framesize(sensor.QVGA) # Set frame size to QVGA (320x240)
sensor.skip_frames(time = 2000) # Wait for settings take effect.
# 导入字库
image.font_load(image.UTF8, 16, 16, '/sd/0xA00000_font_uincode_16_16_tblr.Dzk')
if __name__ == "__main__":
# 连接wifi
if enable_espat(3) == False:
print("ERROR: wifi连接失败·")
exit()
else:
print("连接成功")
print('network state:', wifi.isconnected(), wifi.ifconfig())
print("连接成功2")
# 视频和lcd初始化
lcd_init()
clock = time.clock() # Create a clock object to track the FPS.
tim = time.time()
llm_desc = ""
while(True):
try:
clock.tick() # Update the FPS clock.
img = sensor.snapshot() # Take a picture and return the image.
# 每2秒取一次图片
if time.time() -tim >2:
tim = time.time()
# 原图压缩jpeg,转字节
img2 = img.compressed(quality=20)
jpeg_bytes = img2.to_bytes()
print("bytes length: %d bytes[0]: %x%x" %(len(jpeg_bytes), jpeg_bytes[0], jpeg_bytes[1]))
# 发送图片获取描述信息
llm_desc = send_image(jpeg_bytes)
# 图片上加文字显示到lcd
img.draw_string(20,100, llm_desc, x_spacing=2, mono_space=1, color=(255,0,0), scale=2)
lcd.display(img) # Display on LCD
print(clock.fps()) # Note: MaixPy's Cam runs about half as fast when connected
except Exception as e:
print(e)
结项。撒花。