一、项目概况
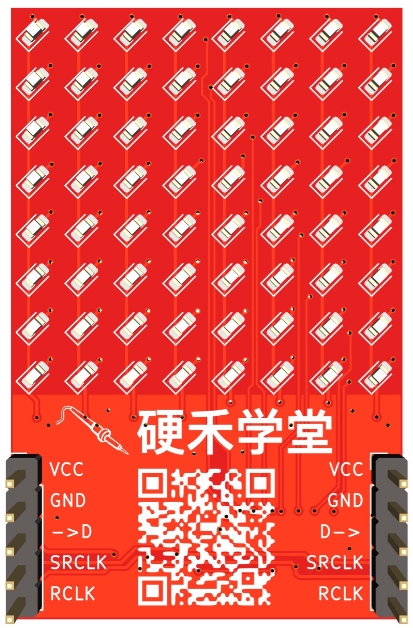
本次“2025寒假一起练”活动提供了5款硬件平台供大家练习,本人选择的是第五款硬件,基于CrowPanel ESP32 Display 4.3英寸HMI的开发板,为啥选择这款呢?尽管这款开发板布置的任务相对较难,但其支持的开发IDE比较多,资料也比较丰富,而且可以借助这款开发板脑补一下关于LVGL方面的编程空白,同时也可以验证当初参加硬禾学堂的《硬禾实战营焊接训练用LED点阵灯板》活动,曾手动DIY焊接的灯板效果。
此项目采用PlatformIO工具开发,此工具是集成于Visual Studio Code,这款工具入手简单,可以参考4.3 英寸 ESP32 Dispaly PlatformIO 教程,搭建环境也没那么复杂,结合SquareLine Studio可快速构建预设GUI界面。实现的功能是基于官方提供的“CrowPanel_ESP32_4.3_PIO_Demo”工程,采用SquareLine Studio创建初始GUI界面,然后代码中创建一个120X120的正方形画布,在该画布内使用触摸笔手写数字“0”~“9”任意一个数字,并通过点击“推算”按键,经过TensorFlowLite模型推理分析得出最相似的数字,并显示在输出结果的标签栏中,再将该数字值推送给点阵屏进行显示。
二、开发环境介绍
代码编译工具:Visual Studio Code + PlatformIO
GUI辅助工具:SquareLine Studio 1.5.1
SDK版本:CrowPanel_ESP32_4.3_PIO_Demo
按照PlatformIO 入门参考网址,在Visual Studio Code安装Python、PlatformIO,然后启动PlatformIO,创建好基于“Espressif ESP32-S3-DevKitC-1-N8 -ELECROW”的工程,并在Libraries中添加安装“LVGL”、“XPT2046”、“GFX Library for Arduino“、”TensorFlowLite_ESP32”库,通过操作指引,完成点灯实验,说明屏的触摸功能正常,基本开发环境已构建完成。
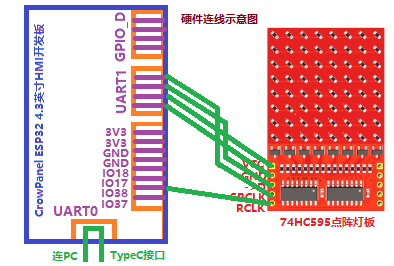
三、硬件框图
四、执行流程介绍
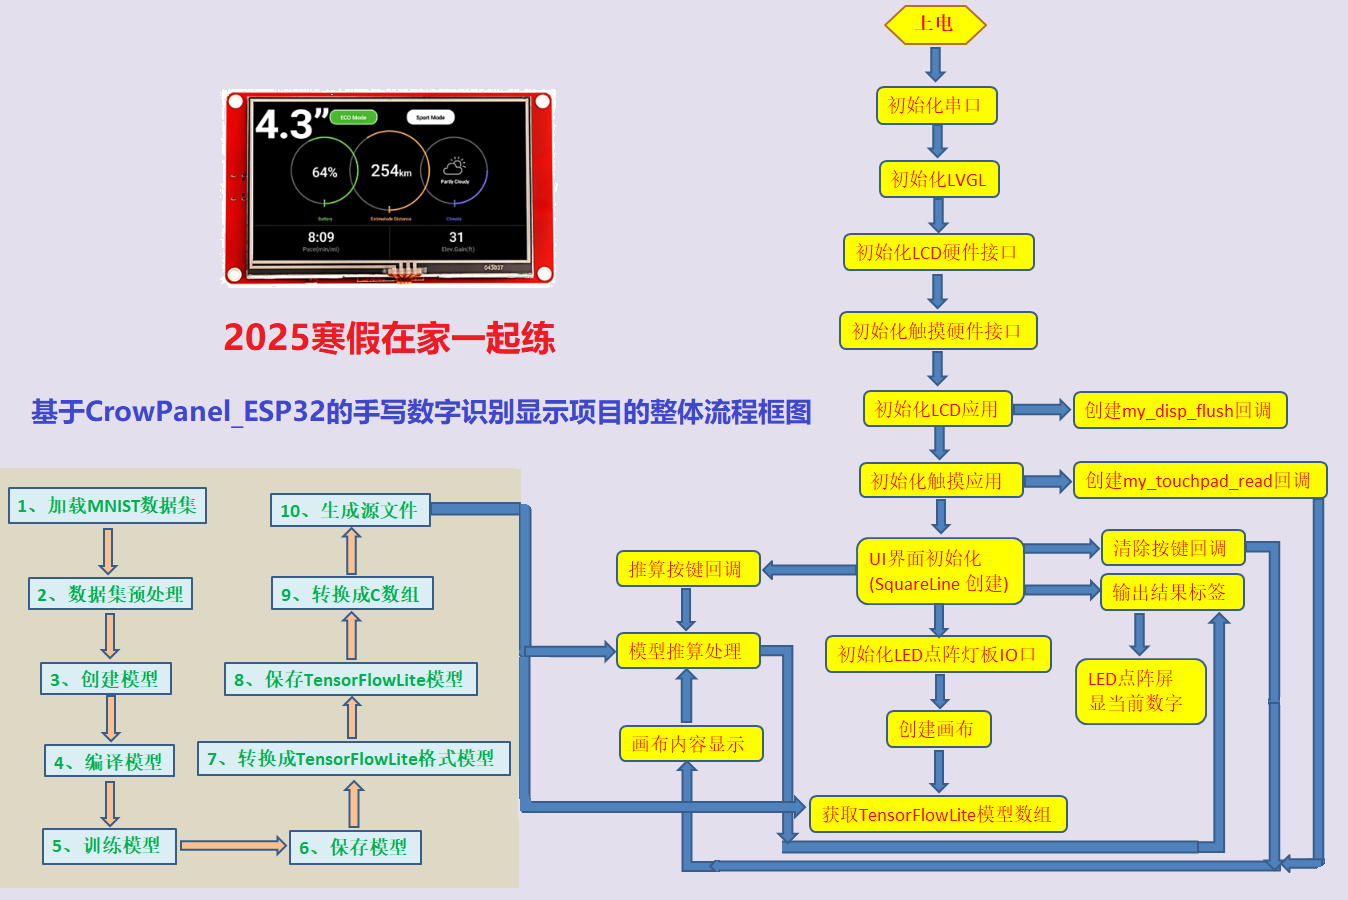
1、正如上图所示,由于用到MNIST手写识别模型,因此在PlatformIO的库中安装好“TensorFlowLite_ESP32”,其次搭建好python环境,配置TensorFlow环境,录制的视频中也提到,如果在中终端中执行完“pip install tensorflow”,运行编写好的python脚本文件提示DLL失败,此时并不是版本不匹配的问题,需要安装Visual Studio 2015,详细配置可转阅TensorFlow的环境配置与安装。工程包中的“train_mnist.py”文件,完成了上面流程图中左边的工作,即将MNIST模型的数据集转成TensorFlowLite模型,并最终生成一个数组,供ESP32工程源码调用。
2、工程基于Demo创建,GUI初始界面由SquareLine Studio构建,界面如下:
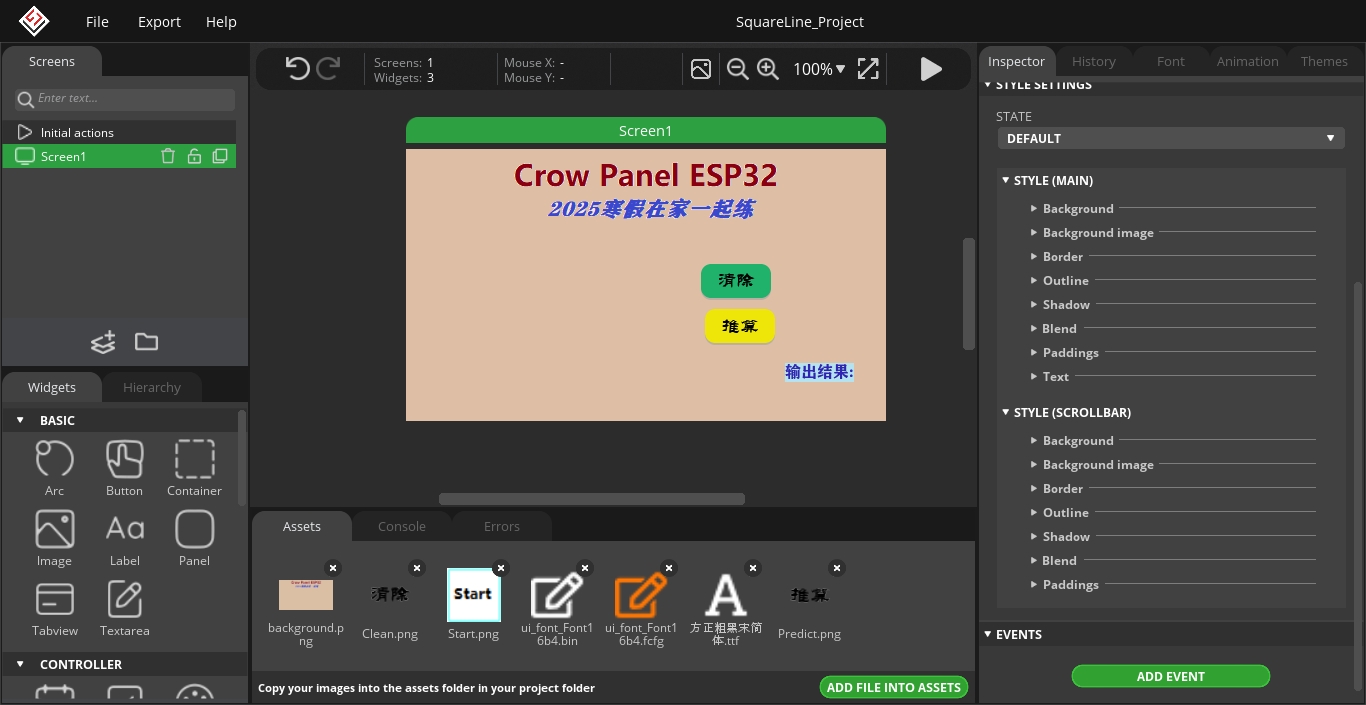
工程中的主要功能通过三个回调函数实现,即实时触摸画布回读函数,一个清除按键回调函数,一个推算按键回调函数。当用户在有效画布区域内手写“0”~“9”任意一个数字后,再点击“推算”按键,此时会将120X120大小的画布图样压缩成标准的28X28,然后与TensorFlowLite模型进行一个推理运算,得出与这10个数字中最相似的数字。然后将这个推算结果值显示在触摸屏的标签栏中,并将该推算值存储到全局变量,由loop函数中的“hc.show_led_digital(curValue); ”去点亮点阵灯板。用户如需再次手写,需要按下“清除”按键,将画布内容清除,用到void ui_event_Button1(lv_event_t * e)的回调。
3、关于点阵灯板的显示,由于74HC595内部包含两个主要部分:移位寄存器和存储寄存器。移位寄存器负责接收串行输入数据,而存储寄存器则负责将数据并行输出到外部设备。串行数据输入:通过D->引脚,74HC595可以接收串行数据。每次时钟信号SRCLK的上升沿,移位寄存器会将当前的串行数据向前移动一位,并从D->引脚读取新的数据位。并行数据输出:当移位寄存器接收完8位数据后,通过RCLK引脚的上升沿信号,数据会从移位寄存器传输到存储寄存器。此时,存储寄存器中的数据会并行输出到Q0至Q7引脚,两颗74HC595则能实现8X8的点阵屏显示。74HC595支持级联使用,视频演示部分就使用了本人之前DIY焊接的两块同款8X8点阵灯板。

五、工程源码
正如附件所示,关于UI界面设计方面,采用SquareLine Studio工具直接导出UI源码,这里展示部分源码。
1、开机初始化界面的主要函数ui_Screen1_screen_init()见如下:
// This file was generated by SquareLine Studio
// SquareLine Studio version: SquareLine Studio 1.5.1
// LVGL version: 8.3.6
// Project name: SquareLine_Project

#include "ui.h"

void ui_Screen1_screen_init(void)
{
    ui_Screen1 = lv_obj_create(NULL);
    lv_obj_clear_flag(ui_Screen1, LV_OBJ_FLAG_SCROLLABLE);      /// Flags
    lv_obj_set_style_bg_img_src(ui_Screen1, &ui_img_background_png, LV_PART_MAIN | LV_STATE_DEFAULT);

    ui_Button1 = lv_btn_create(ui_Screen1);
    lv_obj_set_width(ui_Button1, 70);
    lv_obj_set_height(ui_Button1, 34);
    lv_obj_set_x(ui_Button1, 90);
    lv_obj_set_y(ui_Button1, -4);
    lv_obj_set_align(ui_Button1, LV_ALIGN_CENTER);
    lv_obj_set_style_bg_color(ui_Button1, lv_color_hex(0x25B06F), LV_PART_MAIN | LV_STATE_DEFAULT);
    lv_obj_set_style_bg_opa(ui_Button1, 255, LV_PART_MAIN | LV_STATE_DEFAULT);
    lv_obj_set_style_bg_img_src(ui_Button1, &ui_img_clean_png, LV_PART_MAIN | LV_STATE_DEFAULT);
    lv_obj_set_style_bg_color(ui_Button1, lv_color_hex(0x06E5FB), LV_PART_MAIN | LV_STATE_PRESSED);
    lv_obj_set_style_bg_opa(ui_Button1, 255, LV_PART_MAIN | LV_STATE_PRESSED);
    lv_obj_add_event_cb(ui_Button1, ui_event_Button1, LV_EVENT_ALL, NULL);

    ui_Label1 = lv_label_create(ui_Screen1);
    lv_obj_set_width(ui_Label1, LV_SIZE_CONTENT);   /// 2
    lv_obj_set_height(ui_Label1, LV_SIZE_CONTENT);    /// 2
    lv_obj_set_x(ui_Label1, 90);
    lv_obj_set_y(ui_Label1, 82);
    lv_obj_set_align(ui_Label1, LV_ALIGN_CENTER);
    lv_label_set_text(ui_Label1, "输出结果:");
    lv_obj_set_style_text_color(ui_Label1, lv_color_hex(0x3124B0), LV_PART_MAIN | LV_STATE_DEFAULT);
    lv_obj_set_style_text_opa(ui_Label1, 255, LV_PART_MAIN | LV_STATE_DEFAULT);
    lv_obj_set_style_text_font(ui_Label1, &ui_font_Font16b4, LV_PART_MAIN | LV_STATE_DEFAULT);
    lv_obj_set_style_bg_color(ui_Label1, lv_color_hex(0xB3E3E8), LV_PART_MAIN | LV_STATE_DEFAULT);
    lv_obj_set_style_bg_opa(ui_Label1, 255, LV_PART_MAIN | LV_STATE_DEFAULT);

    ui_Button2 = lv_btn_create(ui_Screen1);
    lv_obj_set_width(ui_Button2, 70);
    lv_obj_set_height(ui_Button2, 34);
    lv_obj_set_x(ui_Button2, 94);
    lv_obj_set_y(ui_Button2, 41);
    lv_obj_set_align(ui_Button2, LV_ALIGN_CENTER);
    lv_obj_set_style_bg_color(ui_Button2, lv_color_hex(0xE8E50C), LV_PART_MAIN | LV_STATE_DEFAULT);
    lv_obj_set_style_bg_opa(ui_Button2, 255, LV_PART_MAIN | LV_STATE_DEFAULT);
    lv_obj_set_style_bg_img_src(ui_Button2, &ui_img_predict_png, LV_PART_MAIN | LV_STATE_DEFAULT);
    lv_obj_set_style_bg_color(ui_Button2, lv_color_hex(0x0DE3F8), LV_PART_MAIN | LV_STATE_PRESSED);
    lv_obj_set_style_bg_opa(ui_Button2, 255, LV_PART_MAIN | LV_STATE_PRESSED);
    lv_obj_add_event_cb(ui_Button2, ui_event_Button2, LV_EVENT_ALL, NULL);
}
2、按键1(清除)回调函数,实现画布区域的清除。
//“清除”按键的回调函数
void ui_event_Button1(lv_event_t * e)
{
    lv_event_code_t event_code = lv_event_get_code(e);
    if(event_code == LV_EVENT_CLICKED) {
        cleanflag = 1;  //loop()函数中进行清除画布内容的操作
    }
}
3、按键2(推算)回调函数,获取经模型推理分析得出的最相似数字,并将该值显示在标签栏中,且将值保存到全局变量中,loop()函数中将该数字发送给点阵屏处理函数。
//“推算”按键的回调函数
void ui_event_Button2(lv_event_t * e)
{
    lv_event_code_t event_code = lv_event_get_code(e);
    if(event_code == LV_EVENT_CLICKED)
    {
      int digit = predict();    //推理后获取的数字值
      if(digit >= 0)
      {
          char buf[32];
          snprintf(buf, sizeof(buf), "Result: %d", digit);
          lv_label_set_text(ui_Label1, buf);   //屏幕标签栏中显示buf中的字符
          Serial.printf("Predicted digit: %d\n", digit);
          curValue = digit;  // 赋值给点阵屏显示的存储数字变量
      } else
      {
          lv_label_set_text(ui_Label1, "Result: Error");
          Serial.println("Prediction failed");
          curValue = -1;
      }
    }
}
4、手写触摸屏回调,实时显示当前用户对有效画布区域的手写输入。
void my_touchpad_read(lv_indev_drv_t *indev_driver, lv_indev_data_t *data)    //触摸屏实时回调读取
{
  if (touch_has_signal())
  {
    if (touch_touched())
    {
      data->state = LV_INDEV_STATE_PR;

      /*Set the coordinates*/
      data->point.x = touch_last_x;
      data->point.y = touch_last_y;
      Serial.print( "Data x :" );
      Serial.println( touch_last_x );
      Serial.print( "Data y :" );
      Serial.println( touch_last_y );
      //画布区域的坐标限定
      if(touch_last_x >= 160 && touch_last_x <= 160 + CANVAS_WIDTH && touch_last_y >= 100 && touch_last_y <= 100 + CANVAS_HEIGHT)
      {
        if(last_point.x != -1)
        {
          draw_point[0].x = last_point.x - 160;
          draw_point[0].y = last_point.y - 100;
          draw_point[1].x = touch_last_x - 160;
          draw_point[1].y = touch_last_y - 100;
          lv_canvas_draw_line(canvas,draw_point,2,&line_dsc);
        }
        last_point.x = touch_last_x;
        last_point.y = touch_last_y;
      }
    }
    else if (touch_released())
    {
      data ->state = LV_INDEV_STATE_REL;
      last_point.x = -1;
      last_point.y = -1;
    }
  }
  else
  {
    data->state = LV_INDEV_STATE_REL;
  }
}
5、初始化画布区域创建
canvas = lv_canvas_create(lv_scr_act());     //创建画布
  lv_canvas_set_buffer(canvas, canvas_buf, 120, 120, LV_IMG_CF_TRUE_COLOR);
  lv_obj_align(canvas, LV_ALIGN_TOP_LEFT, 160, 100);
  lv_canvas_fill_bg(canvas, lv_color_white(), LV_OPA_COVER);

  lv_draw_line_dsc_init(&line_dsc);         //设置画线样式
  line_dsc.color = lv_color_black();
  line_dsc.width = 4;
  line_dsc.opa = LV_OPA_COVER;
6、TensorFlowLite轻量级推理库的初始化部分
model = tflite::GetModel(mnist_model); //TFLite轻量级推理库的数组获取
if (model->version() != TFLITE_SCHEMA_VERSION)
{
Serial.println("Model schema mismatch!");
return;
}
static tflite::MicroInterpreter static_interpreter
(model, resolver, tensor_arena, kTensorArenaSize, µ_error_reporter);
interpreter = &static_interpreter;
TfLiteStatus allocate_status = interpreter->AllocateTensors();
if (allocate_status != kTfLiteOk)
{
Serial.println("AllocateTensors() failed");
return;
}
input = interpreter->input(0);
output = interpreter->output(0);
7、模型推理分析部分
//模型预处理函数
void preprocess_canvas(void)
{
  //120x120的画布缩放成28x28
  float scale = 120.0f / 28.0f;
  for(int y = 0; y < 28; y++)
  {
      for(int x = 0; x < 28; x++)
      {
          int src_x = (int)(x * scale);
          int src_y = (int)(y * scale);
          int src_idx = src_y * 120 + src_x;
          float pixel = (1.0f - lv_color_brightness(canvas_buf[src_idx]) / 255.0f);
          input->data.f[y * 28 + x] = pixel;
      }
  }
}

//推理函数
static int predict(void)
{
  preprocess_canvas();

  TfLiteStatus invoke_status = interpreter->Invoke();
  if(invoke_status != kTfLiteOk)
      return -1;

  float max_prob = 0;
  int predicted_digit = -1;

  for(int i = 0; i < 10; i++)
  {
      if(output->data.f[i] > max_prob)
      {
          max_prob = output->data.f[i];
          predicted_digit = i;
      }
  }
  return predicted_digit;
}
8、关于74HC595点阵灯板初始化及实现数字显示代码
#include "hc595.h"

unsigned int dig_1[10][8]=
{
  {0x1c,0x22,0x22,0x22,0x22,0x22,0x22,0x1c},//0
  {0x1c,0x08,0x08,0x08,0x08,0x08,0x0c,0x08},//1
  {0x3e,0x04,0x08,0x10,0x20,0x20,0x22,0x1c},//2
  {0x1c,0x22,0x20,0x20,0x18,0x20,0x22,0x1c},//3
  {0x20,0x20,0x3e,0x22,0x24,0x28,0x30,0x20},//4
  {0x1c,0x22,0x20,0x20,0x1e,0x02,0x02,0x3e},//5
  {0x1c,0x22,0x22,0x22,0x1e,0x02,0x22,0x1c},//6
  {0x04,0x04,0x04,0x08,0x10,0x20,0x20,0x3e},//7
  {0x1c,0x22,0x22,0x22,0x1c,0x22,0x22,0x1c},//8
  {0x1c,0x22,0x20,0x3c,0x22,0x22,0x22,0x1c},//9
};
void hc_595::init()
{
	pinMode(DIN, OUTPUT);
	pinMode(SRCLK, OUTPUT);
	pinMode(RCLK, OUTPUT);
	digitalWrite(DIN, LOW);
	digitalWrite(SRCLK, LOW);
	digitalWrite(RCLK, LOW);
}
void hc_595::write(byte row,byte col )
{
	int pin_state;//输出的DIN
	digitalWrite(SRCLK, LOW);
	digitalWrite(RCLK, LOW);
	for (int i = 7; i >= 0; --i)//行按照d7-d0高位到低位对应
	{
		if (row & (1 << i))
		{
			pin_state = 1;
		}
		else
		{
			pin_state = 0;
		}
    digitalWrite(SRCLK, LOW);
		digitalWrite(DIN, pin_state);
		digitalWrite(SRCLK, HIGH);
	}
  for (int i = 7; i >= 0; --i)//列按照d7-d0高位到低位对应
  {
    if (col & (1 << i))
    {
      pin_state = 1;
    }
    else
    {
      pin_state = 0;
    }
    digitalWrite(SRCLK, LOW);
    digitalWrite(DIN, pin_state);
    digitalWrite(SRCLK, HIGH);
  }
  digitalWrite(RCLK, HIGH);
  delayMicroseconds(500);//数据锁存500us
  digitalWrite(RCLK, LOW);
}
void hc_595::show_digital(unsigned int i,int delay_ms)
{
   for(int t=0;t<delay_ms;++t)
   {
        byte row=0x80;
        for(int j=0;j<8;++j)
        {
          this->write(row,dig_1[i][j]);
           row>>=1;
        }
   }
    this->write(0x00,0x00);
    digitalWrite(RCLK, HIGH);
    delayMicroseconds(500);//数据锁存500us
    digitalWrite(RCLK, LOW);
}

void hc_595::show_led_digital(int number)
{
  switch(number)
  {
    case 0:
      this->show_digital(0);
      break;
    case 1:
      this->show_digital(1);
      break;
    case 2:
      this->show_digital(2);
      break;
    case 3:
      this->show_digital(3);
      break;
    case 4:
      this->show_digital(4);
      break;
    case 5:
      this->show_digital(5);
      break;
    case 6:
      this->show_digital(6);
      break;
    case 7:
      this->show_digital(7);
      break;
    case 8:
      this->show_digital(8);
      break;
    case 9:
      this->show_digital(9);
      break;
  }
}
9、最后是本项目至关重要的python脚本源文件,由于MNIST手写数字识别应用广泛,参考的资料比较多,实现方法也多样性,这里笔者采用模型转换的方式,这种实现的方式网上也比较多,开源且易用。
import tensorflow as tf
import numpy as np

# 加载MNIST数据集
mnist = tf.keras.datasets.mnist
(x_train, y_train), (x_test, y_test) = mnist.load_data()

# 数据预处理
x_train = x_train / 255.0
x_test = x_test / 255.0

# 创建模型
model = tf.keras.models.Sequential([
    tf.keras.layers.Flatten(input_shape=(28, 28)),
    tf.keras.layers.Dense(128, activation='relu'),
    tf.keras.layers.Dropout(0.2),
    tf.keras.layers.Dense(10, activation='softmax')
])

# 编译模型
model.compile(optimizer='adam',
              loss='sparse_categorical_crossentropy',
              metrics=['accuracy'])

# 训练模型
model.fit(x_train, y_train, epochs=5)

# 保存模型
model.save('mnist_model.h5')

# 转换为TFLite格式
converter = tf.lite.TFLiteConverter.from_keras_model(model)
converter.optimizations = [tf.lite.Optimize.DEFAULT]
converter.target_spec.supported_types = [tf.float32]
tflite_model = converter.convert()

# 保存TFLite模型
with open('model.tflite', 'wb') as f:
    f.write(tflite_model)

# 转换为C数组
def convert_to_c_array(data):
    c_array = []
    for byte in data:
        c_array.append(f"0x{byte:02x}")
    return ",".join(c_array)
c_array = convert_to_c_array(tflite_model)

# 生成CPP源文件
with open('src/mnist_model.cpp', 'w') as f:
    f.write("const unsigned char mnist_model[] = {")
    f.write(c_array)
    f.write("};\n\n")
    f.write("const unsigned int mnist_model_len = sizeof(mnist_model)/sizeof(mnist_model[0]);\n\n")
六、项目总结
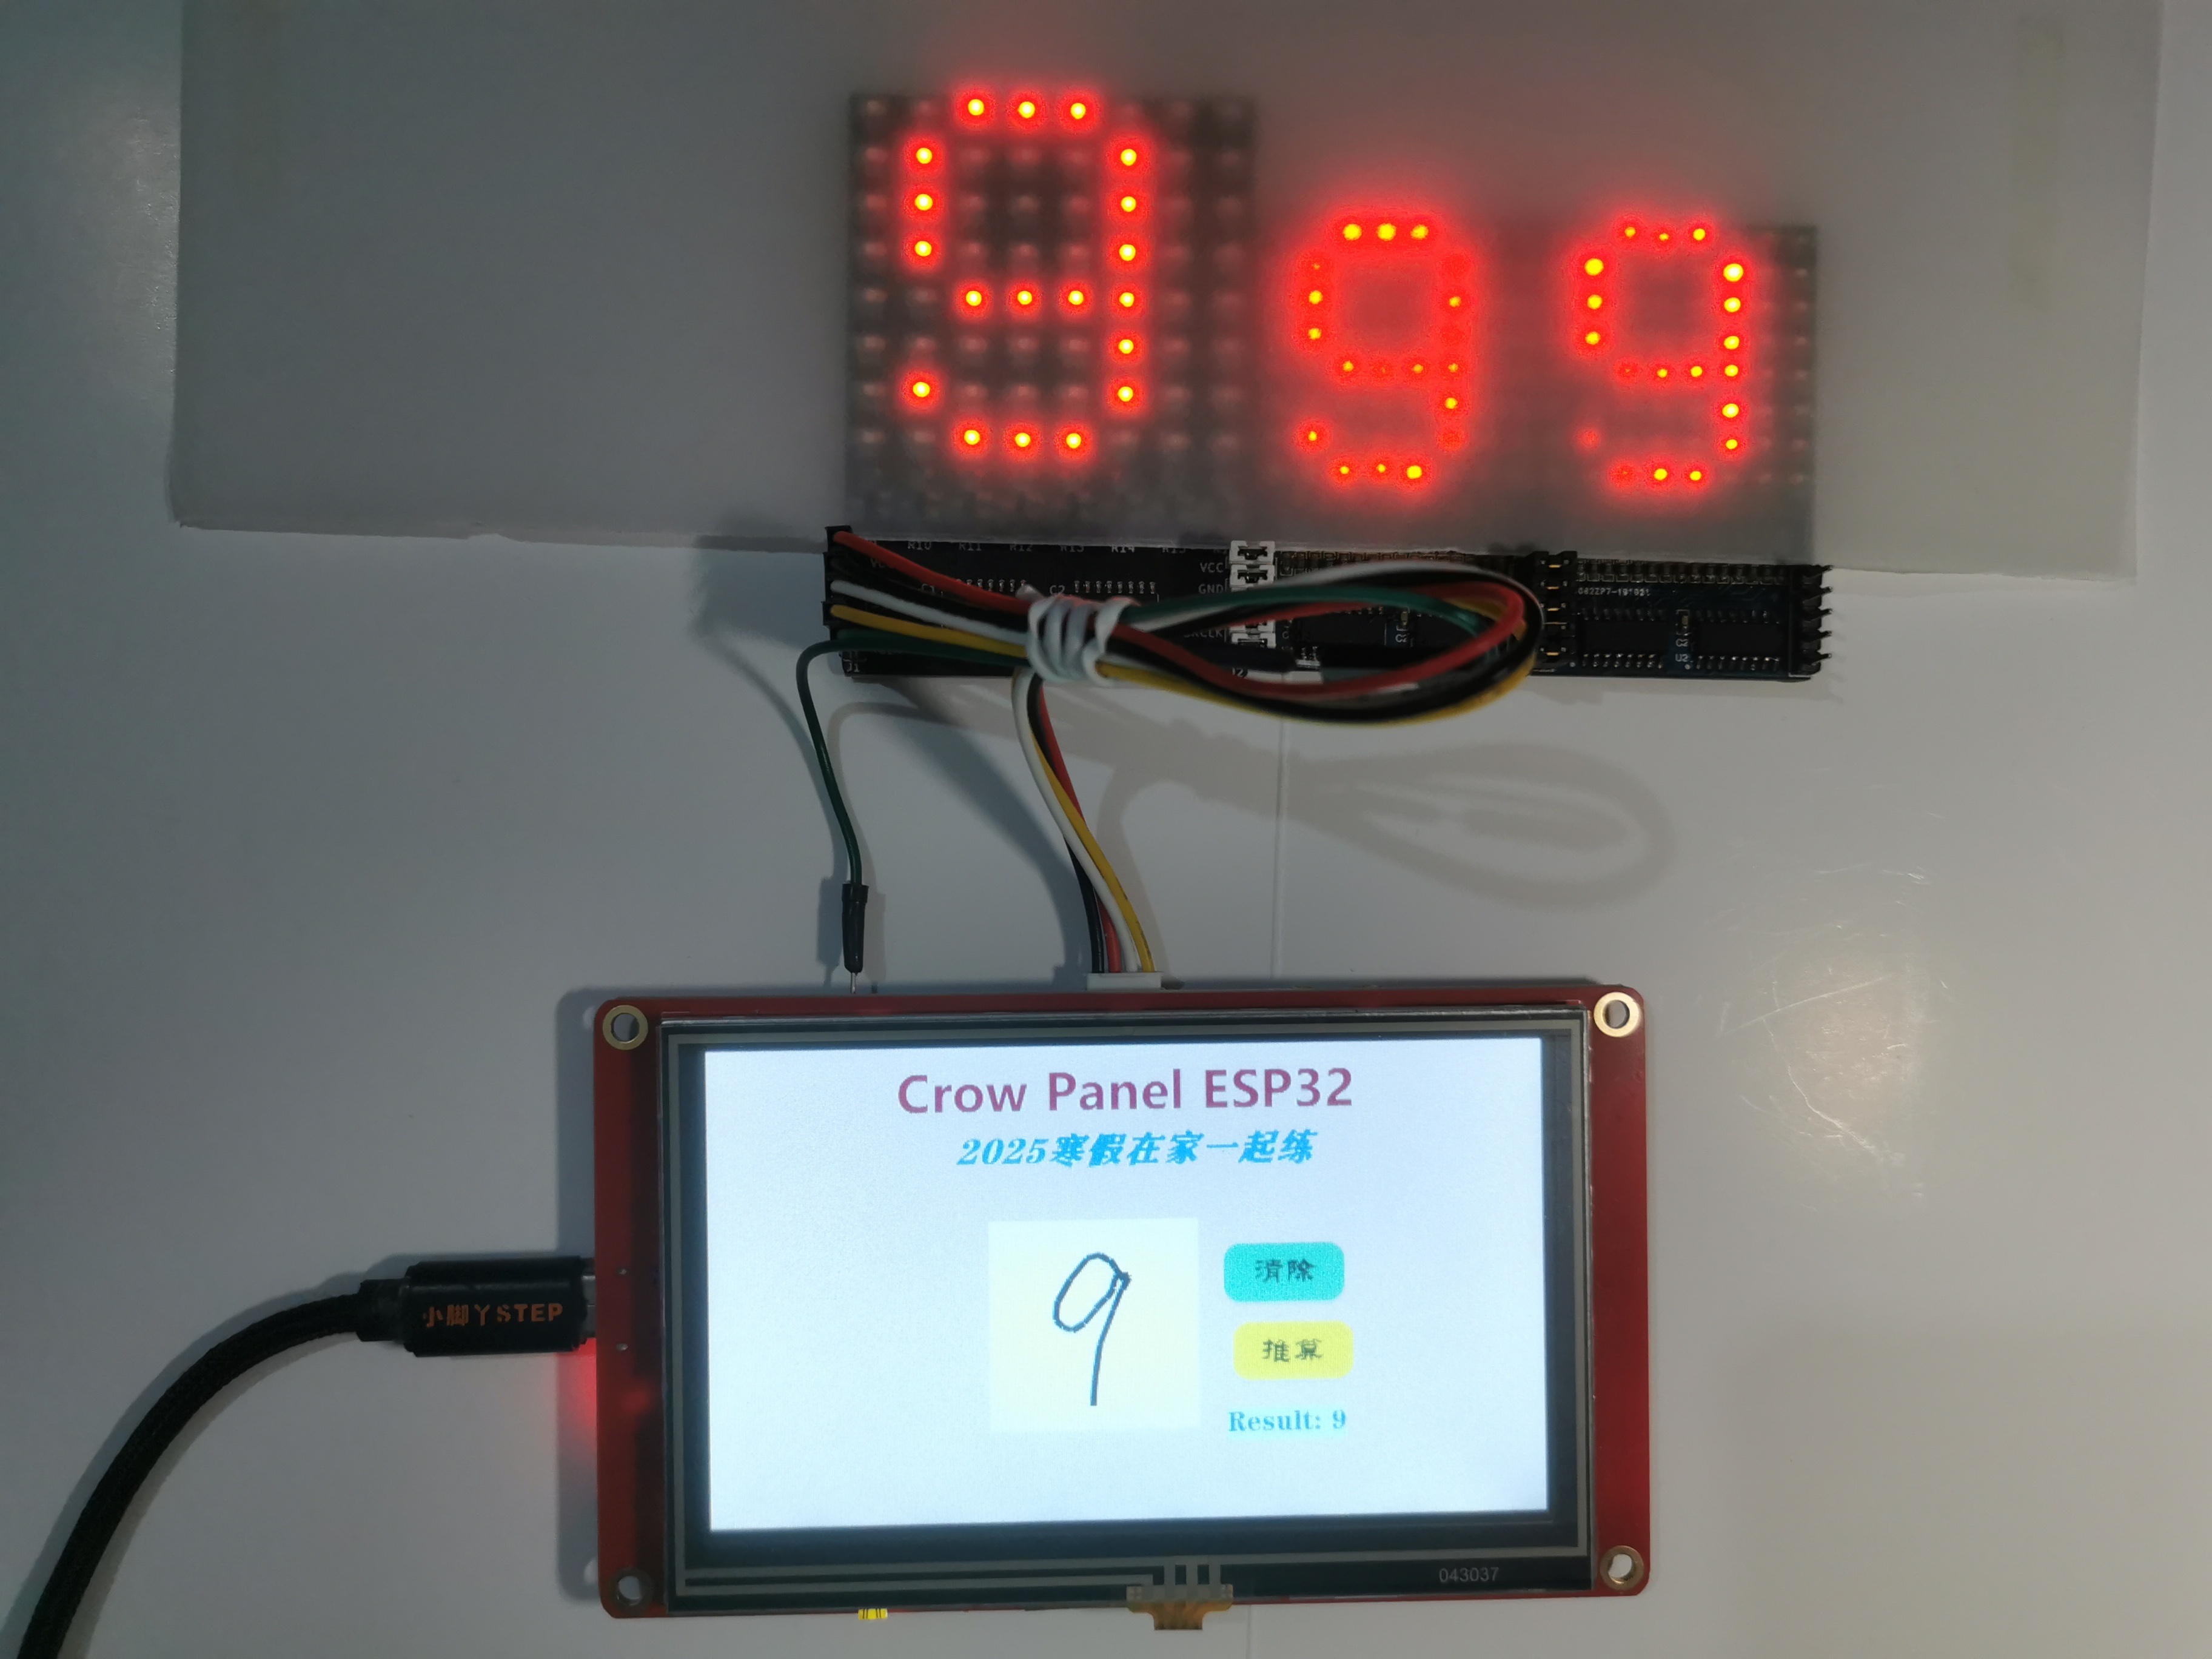
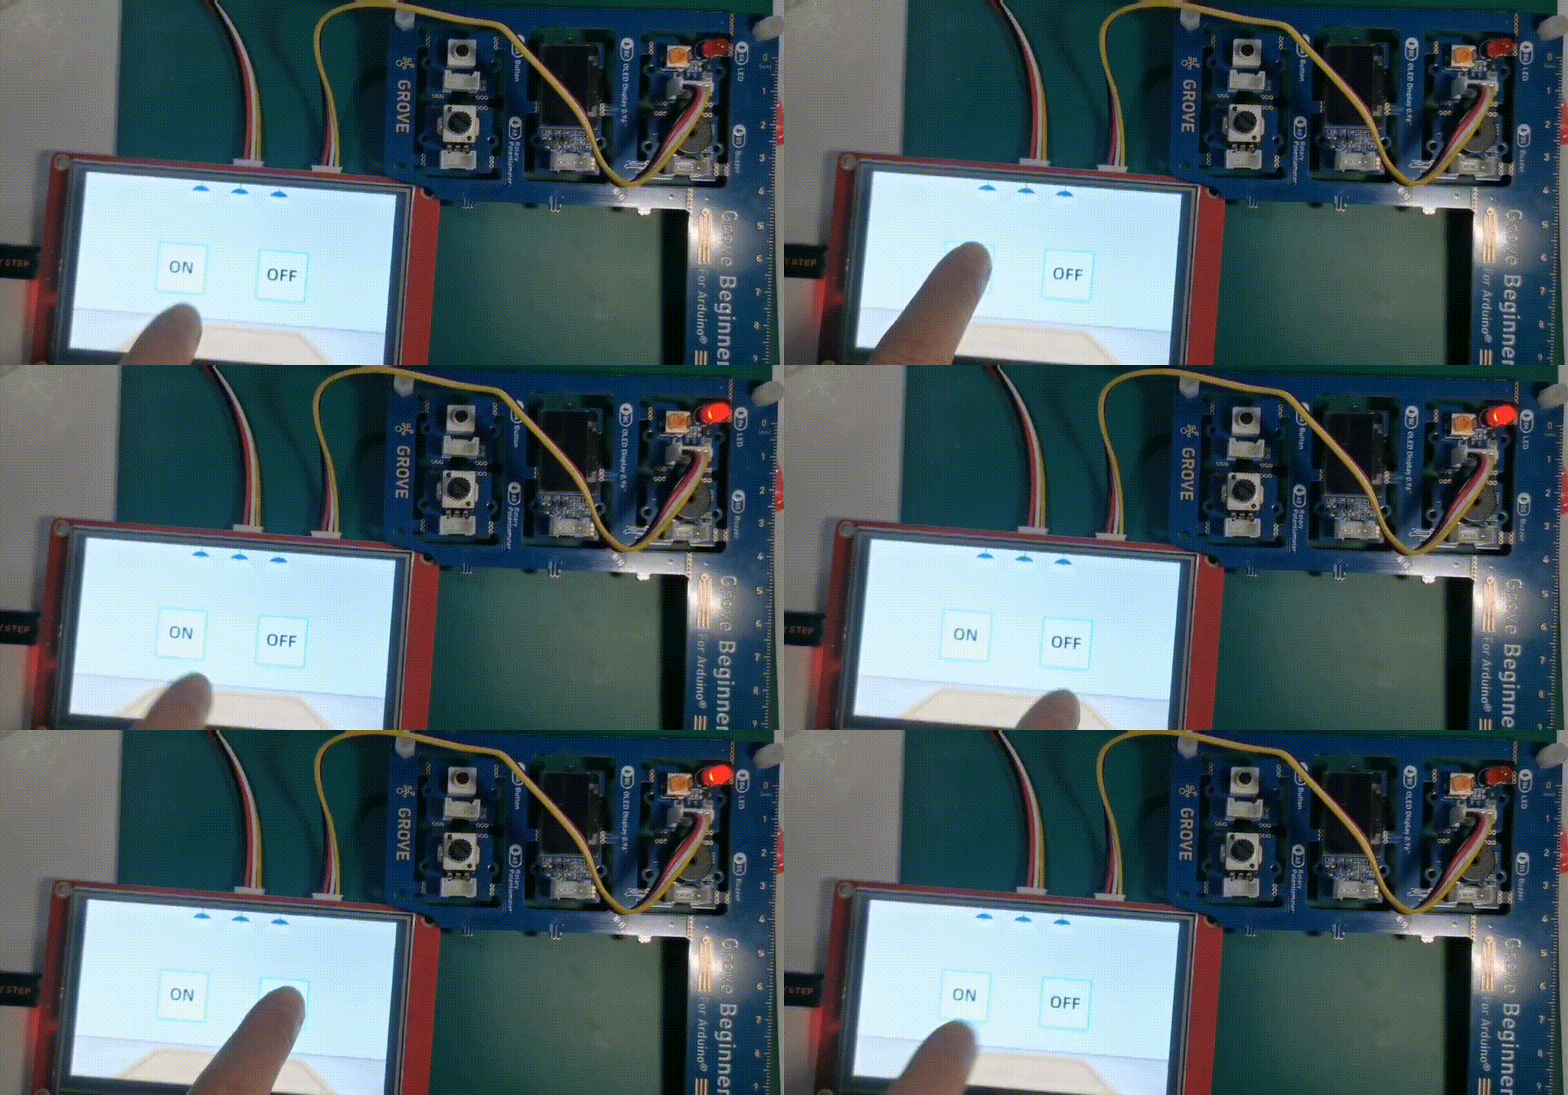
经此次项目的实践,熟悉了关于LVGL的基础编程,也学会了借助SquareLine Studio工具快速构建GUI界面。项目中也有遇到比较棘手的问题,比如前期卡在搭建基于Arduino IDE开发环境上,后面采用了PlatformIO工具,搭建起来也比较简便,调试起来也比Arduino友好。由于项目中运用到手写识别,MNIST模型构建方法显得尤为重要,如果训练参考模型实现的方法不对,则后期图片处理后的识别率受影响。项目实现的手写数字识别效率较高,见上图,同时也验证了当初手动焊接的LED点阵灯板良好,无短路,空焊的现象。
这款Elecrow ESP32 4.3英寸显示屏触摸效果很好,响应速度快,集成WiFi和蓝牙无线功能,主频高达240MHz,是一款功能强大的HMI触摸屏,感谢电子森林与Elecrow举办的此次“一起练”活动,受益匪浅。
