
项目介绍
该项目采用电子森林出品的RP2040游戏机和艾迈斯欧司朗的dtof8821飞行时间传感器,采用micropython作为编程语音通过对TOF传感器的多帧数据采集并且计算最终实现的手势识别功能。支持识别上下左右(左和右没有做菜单适配)从而来控制桌面的菜单
硬件介绍
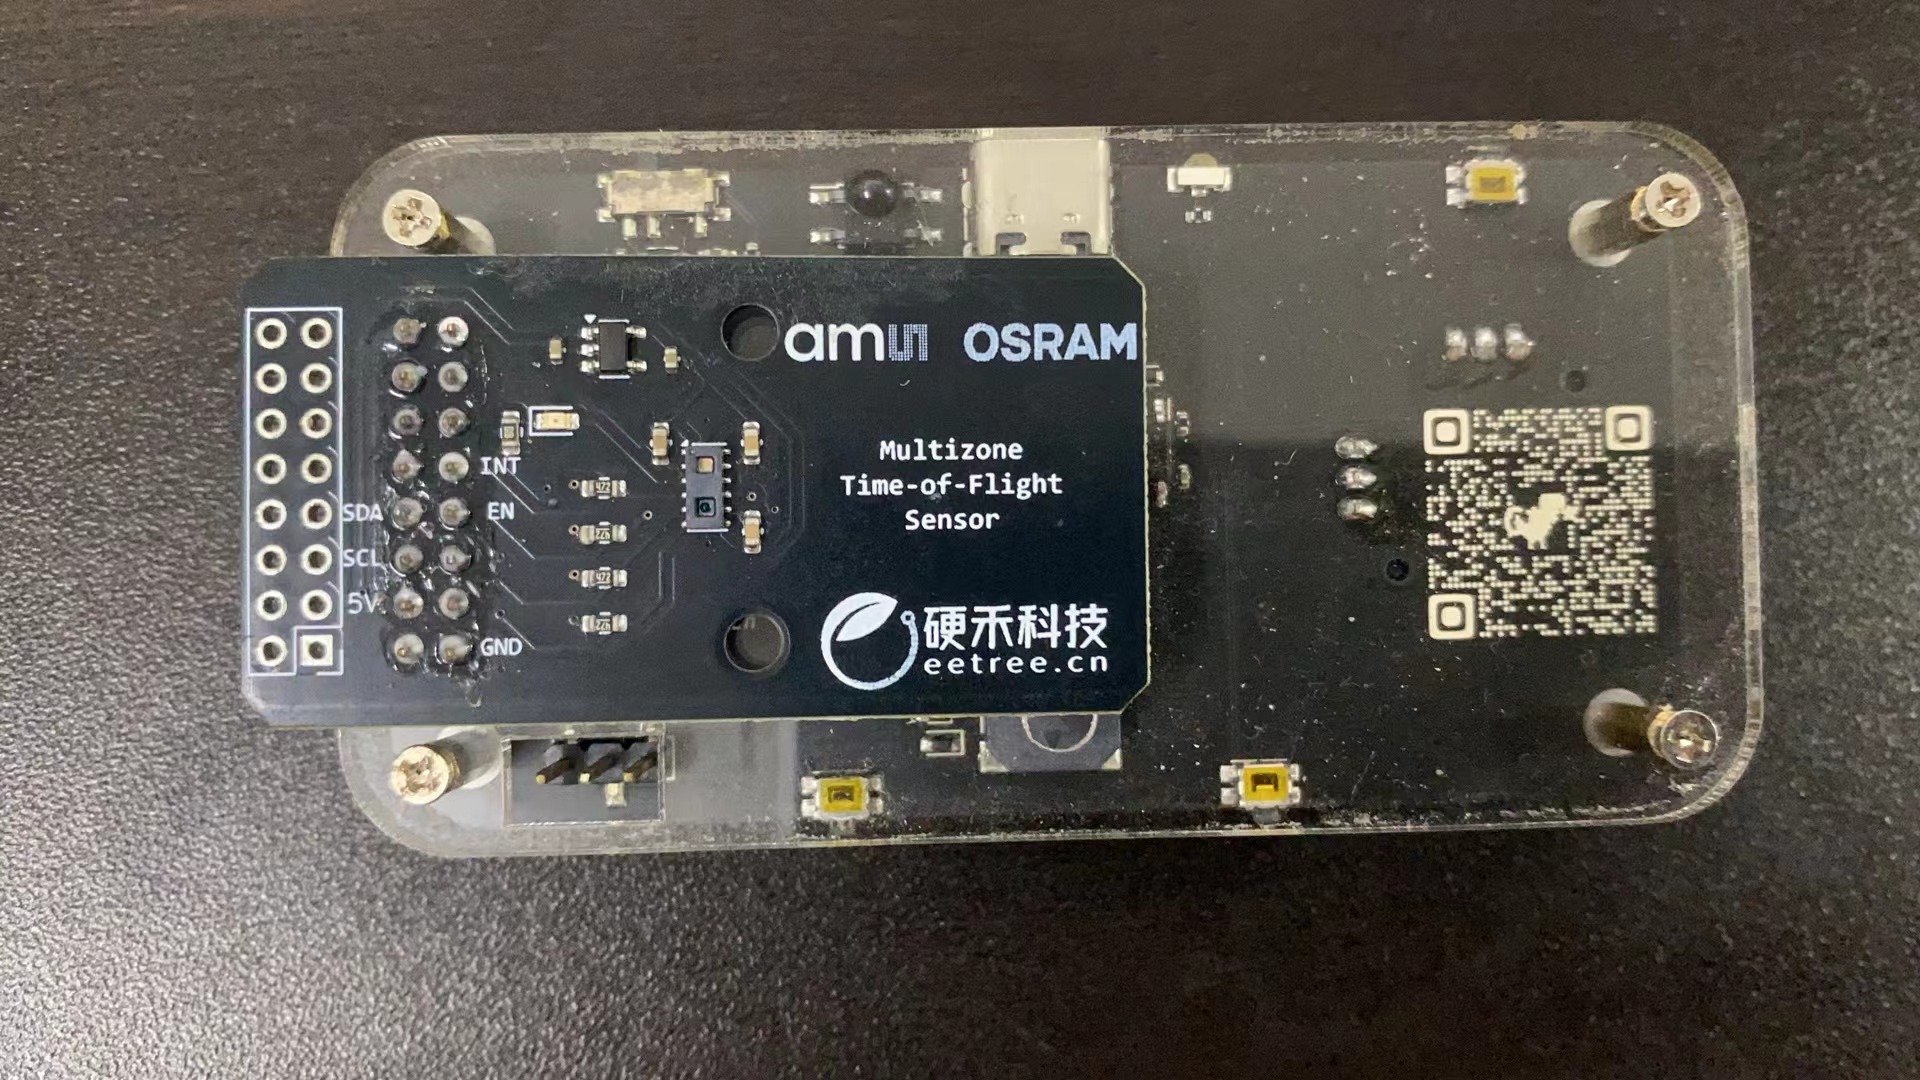
RP2040 Game Kit
RP2040 Game Kit是基于树莓派RP2040的嵌入式系统学习平台,通过USB Type-C连接器供电,采用RP2040作为主控,具有双核Arm Cortex M0+内核和264KB内存,可通过MicroPython或C/C++编程,性能强大。板上四向摇杆 + 2个轻触按键 + 一个三轴姿态传感器MMA7660用做输入控制,并有240*240分辨率的彩色LCD屏显示,片内温度传感器、并支持外部4路模拟信号输入,内部ADC采样率高达500Ksps。可玩性极高,可移植多款复古游戏,还可作为电赛的控制、显示接口平台,搭配传感器、模拟电路外还可以完成更多创意项目。(来自电子森林)
TMF8821
dToF模块是基于 TMF8821 设计的直接飞行时间 (dToF) 传感器模块,TMF8821采用单个模块化封装,带有相关的 VCSEL(垂直腔面发射激光器)。dToF 设备基于 SPAD、TDC 和直方图技术,可实现 5000 mm 的检测范围。由于它的镜头位于 SPAD 上,它支持 3x3、4x4 和 3x6 多区域输出数据以及宽广的、动态可调的视野。VCSEL 上方的封装内的多透镜阵列 (MLA) 拓宽了 FoI(照明场)。原始数据的所有处理都在片上进行,TMF8821在其 I2C 接口上提供距离信息和置信度值。
TMF8821 dToF传感器模块与RP2040游戏机管脚匹配,插上直接可以使用,并在侧面预留了扩展接口,可以自由焊接/调试/抓取数据。
方案框图和项目设计思路介绍
项目的主要思路为:实现菜单的功能和切换, 距离的测算和计算手势
项目实现思路一
项目的主要设计思路为设法获取到TOF传感器测量出来的距离,每一个距离为9个点, 通过两帧的数据运算和关键点信息,那么可以计算出手势移动的方向(因为手掌是凹凸不平的,如果使用的是一个光滑的平面的话则测量不出来实际的距离信息). 然后通过计算出来的方向来控制菜单的切换。
其中项目官方限制不允许使用Arduino的官方库进行编程, 对于驱动程序经过我的多方查找, 移植和修改了GITHUB上的一个TOF8821的驱动实现了9个点的读取。
项目实现思路二
我还使用了另一种方式, 即使用树莓派直接使用官方的python驱动进行驱动。可以直接获取到数据,而对于数据的解算我则是采用sk-learn训练了一个随机森林的模型。 通过对数据的收集和标注(手势在不同距离的不同方向移动)来进行训练,然后当读取到每一帧的数据后,加载随机森林模型对数据进行推理,从而获取到可能的手势结果。这里的难点主要是在于数据的收集, 是一个非常繁琐的工。 我一共是收集了各种数据共计1000+条。 实际上识别的正确率非常低。 因此这里主要介绍第一种方法。
训练代码
import numpy as np
from sklearn.ensemble import RandomForestClassifier
from sklearn.model_selection
import train_test_splitimport joblib

# 加载输入向量
def load_X(filename):
    with open(filename, 'r') as file:
        lines = file.readlines()
        X = []
        for i in range(0, len(lines), 2):
            first_line = list(map(int, lines[i].strip().split()))
            second_line = list(map(int, lines[i + 1].strip().split()))
            sample = first_line + second_line
            X.append(sample)
            return np.array(X)
# 加载分类标签
def load_Y(filename):
    with open(filename, 'r') as file:
    Y = [int(line.strip()) for line in file.readlines()]
    return np.array(Y)


training_file = 'training.txt'
tag_file = 'tag.txt'

#加载文件
X = load_X(training_file)Y = load_Y(tag_file)

#打印形状
print("Shape of X:", X.shape)
print("Shape of Y:", Y.shape)

#分割训练集和测试集
X_train, X_test, Y_train, Y_test = train_test_split(X, Y, test_size=0.2, random_state=50)print(Y_test)
print("Shape of X_train:", X_train.shape)print("Shape of X_test:", X_test.shape)

#创建模型
clf = RandomForestClassifier(n_estimators=10, random_state=42)
#训练
clf = clf.fit(X_train, Y_train)

#保存模型
model_filename = 'random_forest_model.pkl'
joblib.dump(clf, model_filename)
print(f"Model saved to {model_filename}")

loaded_clf = joblib.load(model_filename)print("Loaded model:", loaded_clf)

#进行预测
predictions = loaded_clf.predict(X_test)print("Predictions on test data:", predictions)print("True labels for test data:", Y_test)
#统计准确率
accuracy = np.mean(predictions == Y_test)print(f"Accuracy on test data: {accuracy:.2f}")
加载数据和使用模型来预测的代码
import numpy as np
from smbus2 import SMBus
from tmf882x import TMF882x
import joblib  # 用于保存和加载模型
import time

# 加载模型
model_filename = 'random_forest_model.pkl'
loaded_clf = joblib.load(model_filename)
print("Loaded model:", loaded_clf)

# 读取并提取测量的距离值
def get_distances():
     with SMBus(1) as bus:
     device = TMF882x(bus=bus)
     device.enable()
     measurement = device.measure()
        # 提取 'distance' 值
        distances = [result.distance for result in measurement.results if result.confidence > 0]

        return distances


while True:
    # 获取两次测量的距离数据
    distances_1 = get_distances()
    distances_2 = get_distances()

    # 确保每次测量数据有 9 个有效值
    if len(distances_1) == 9 and len(distances_2) == 9:

    # 将两次测量数据组合成一个特征向量
        feature_vector = distances_1 + distances_2
        print("Feature vector:", feature_vector)

        # 使用模型进行预测
        prediction = loaded_clf.predict([feature_vector])
        print(f"Prediction: {prediction[0]}")
    else:
       print("Each measurement must have exactly 9 valid distance values.")
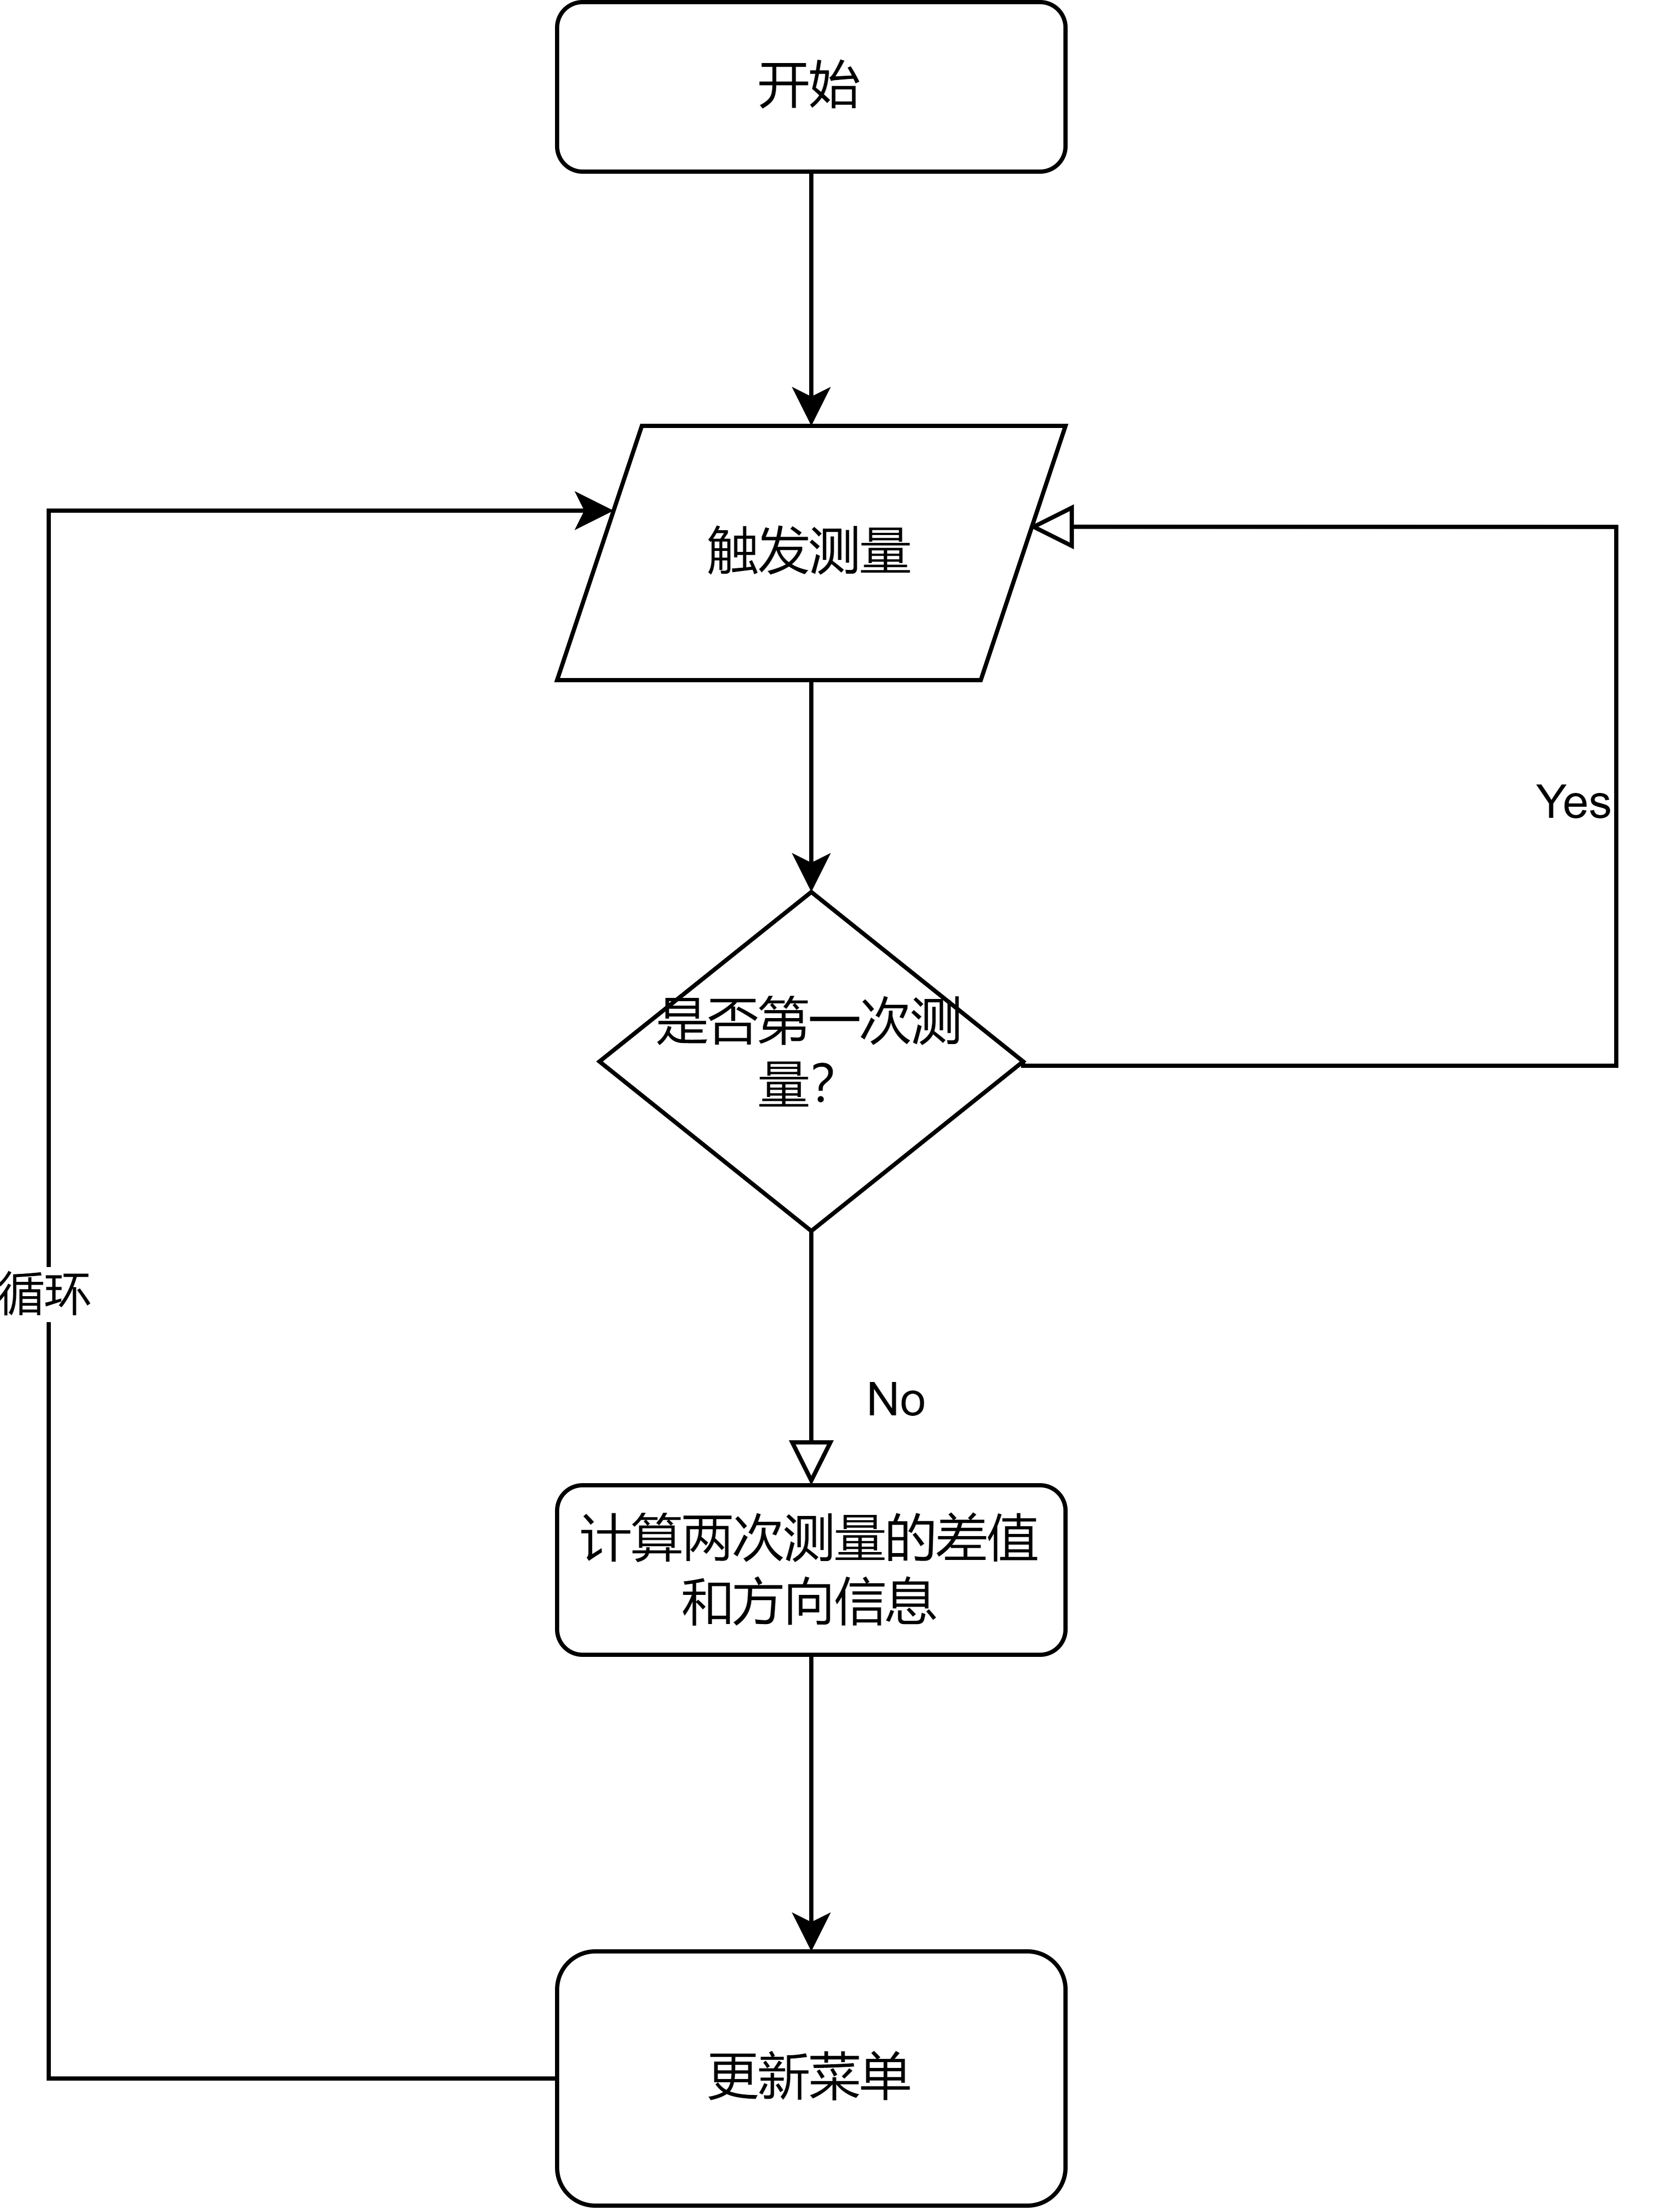
RP2040软件流程图和关键代码介绍
流程图如下:
程序的主要模块分为以下:
- com/i2c_com.py (通用I2C通讯模块)
- tmf8821_app.py (驱动模块)
- tmf8821_device.py (设备状态模块)
- tmf8821_utility.py (功能模块)
用户只需要调用tmf8821_utility 模块下的measure_frame 即可得到一帧测量数据,如下代码所示。
from com.i2c_com import I2C_com, I2C_Settings
from tmf8821_device import Tmf8821Device
from tmf8821_app import Tmf8821App

class Tmf8821Utility(Tmf8821App):

    def __init__(self, ic_com: I2C_com):
        super().__init__(ic_com)

    def open(self, i2c_settings: I2C_Settings = I2C_Settings()):
        return super().open(i2c_settings)

    def init_bootloader_check(self):
        print("Started Bootloader check")
        self.enable()

        if not self.isAppRunning():
            print("Image not found. Initiate Image Download")
            self.downloadAndStartApp()
        print("Application {} started".format(self.getAppId()))

    def measure_frame(self, number_of_frames: int = 1):
        frames = list()
        status = self.startMeasure()
        if status != Tmf8821Device.Status.OK:
            return

        read_frames = 0
        while read_frames < number_of_frames:
            if self.readAndClearInt(self.TMF8X2X_APP_I2C_RESULT_IRQ_MASK):
                read_frames = read_frames + 1
                frame = self.readResult()
                frames.append(frame)

        self.stopMeasure()
        return frames
程序的主要测量步骤如下所示
import uos
import test.st7789 as st7789
from test.fonts import vga1_16x32 as font  # 选择较大的字体
from machine import Pin, SPI, I2C
import utime
from tmf8821_utility import Tmf8821Utility
from com.i2c_com import I2C_com, I2C_Settings
from tmf8821_device import Tmf8821Device
from tmf8821_app import Tmf8821App
import utime
import math


# 创建 I2C 通信对象
ic_com = I2C_com()
# 创建 Tmf8821Utility 实例
tof = Tmf8821Utility(ic_com)

# 打开连接
if Tmf8821App.Status.OK != tof.open():
    tof.error("Error open FTDI device")
    raise RuntimeError("Error open FTDI device")
else:
    tof.log("Opened connection")

tof.init_bootloader_check()

# 获取前 9 个测量结果并计算位移方向
previous_position = None

# ST7789 相关配置
st7789_res = 0
st7789_dc = 1
disp_width = 240
disp_height = 240
CENTER_Y = disp_height // 2
CENTER_X = disp_width // 2

spi_sck = Pin(2)
spi_tx = Pin(3)
spi0 = SPI(0, baudrate=4000000, phase=1, polarity=1, sck=spi_sck, mosi=spi_tx)

# 初始化 ST7789 显示屏
display = st7789.ST7789(
    spi0, disp_width, disp_height,
    reset=Pin(st7789_res, Pin.OUT),
    dc=Pin(st7789_dc, Pin.OUT),
    xstart=0, ystart=0, rotation=0
)

# 菜单项
menu_items = ["UP", "DOWN"]
menu_positions = [
    (CENTER_X - 16, CENTER_Y - 40),  # UP 的位置
    (CENTER_X - 16, CENTER_Y + 10)   # DOWN 的位置
]
selected_index = 0  # 选中的菜单项索引
last_selected = None  # 记录上一次选中的索引


def draw_menu():
    """绘制整个菜单,确保所有项都可见,并更新选中项的箭头"""
    for i, (text, pos) in enumerate(zip(menu_items, menu_positions)):
        # 先清除旧的箭头
        display.text(font, "  " + text, pos[0] - 40, pos[1], st7789.BLACK)
        # 重新绘制文本
        arrow = "> " if i == selected_index else "  "
        display.text(font, arrow + text, pos[0] - 40, pos[1], st7789.WHITE)

# 初始化菜单,确保所有项可见
draw_menu()

while True:
    frames = tof.measure_frame(1)  # 获取 1 帧数据
    utime.sleep(0.1)
    if frames:
        for idx, frame in enumerate(frames):
            count = 0  # 计数器,用于每 3 个值换行
            data = []

            # 获取前 9 个测量结果
            for result_idx, result in enumerate(frame.results):
                if result_idx < 9:
                    # 获取 distanceInMm 并放入 data 列表
                    data.append(result.distanceInMm)

                    #print(result.distanceInMm, end=' ')
                    count += 1

                    # 每输出 3 个值换行
                    if count == 3:
                        print()  # 换行
                        count = 0  # 重置计数器
                else:
                    break  # 超过 9 个结果后停止

            # 计算位移方向(上下左右)
            if len(data) == 9:  # 确保数据完整
                # 转换为 3x3 矩阵
                data_matrix = [data[i:i+3] for i in range(0, 9, 3)]

                # 获取当前帧的位置
                top_left = data_matrix[0][0]  # 左上角
                top_right = data_matrix[0][2]  # 右上角
                bottom_left = data_matrix[2][0]  # 左下角
                bottom_right = data_matrix[2][2]  # 右下角

                # 如果之前有位置,计算位移
                if previous_position:
                    # 计算上下方向的位移(比较第1列与第3列)
                    vertical_displacement = bottom_left - top_left
                    #horizontal_displacement = top_right - top_left

                    print(vertical_displacement)
                    # 根据差值判断上下左右移动
                    if vertical_displacement > 8:
                        selected_index = (selected_index + 1) % len(menu_items)
                        draw_menu()
                        print("Moved down")
                    elif vertical_displacement <=8:
                        selected_index = (selected_index - 1) % len(menu_items)
                        draw_menu()
                        print("Moved up")


                    """if horizontal_displacement > 0:
                        print("Moved right")
                    elif horizontal_displacement < 0:
                        print("Moved left")
                    """
                # 更新前一个位置
                previous_position = data_matrix
    else:
        print("No measurement frames received.")
其最主要的核心逻辑即在while循环中循环调用tof的测量函数触发测量,然后保存两帧测量的数据, 通过关键点位信息计算垂直和水平的偏移距离,根据偏移的距离来获取手势移动的方向。然后触发菜单的更新。
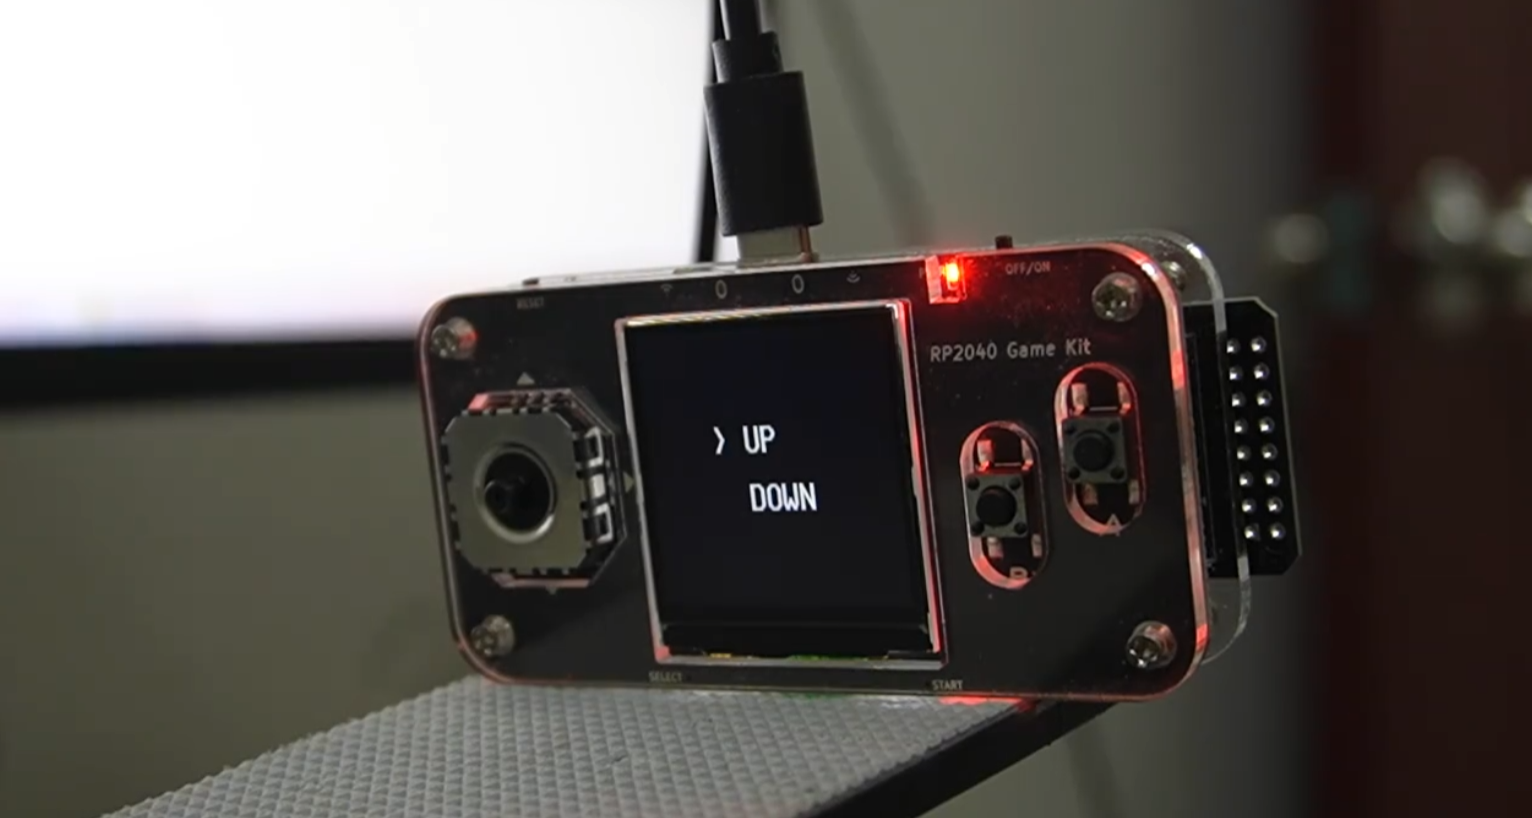
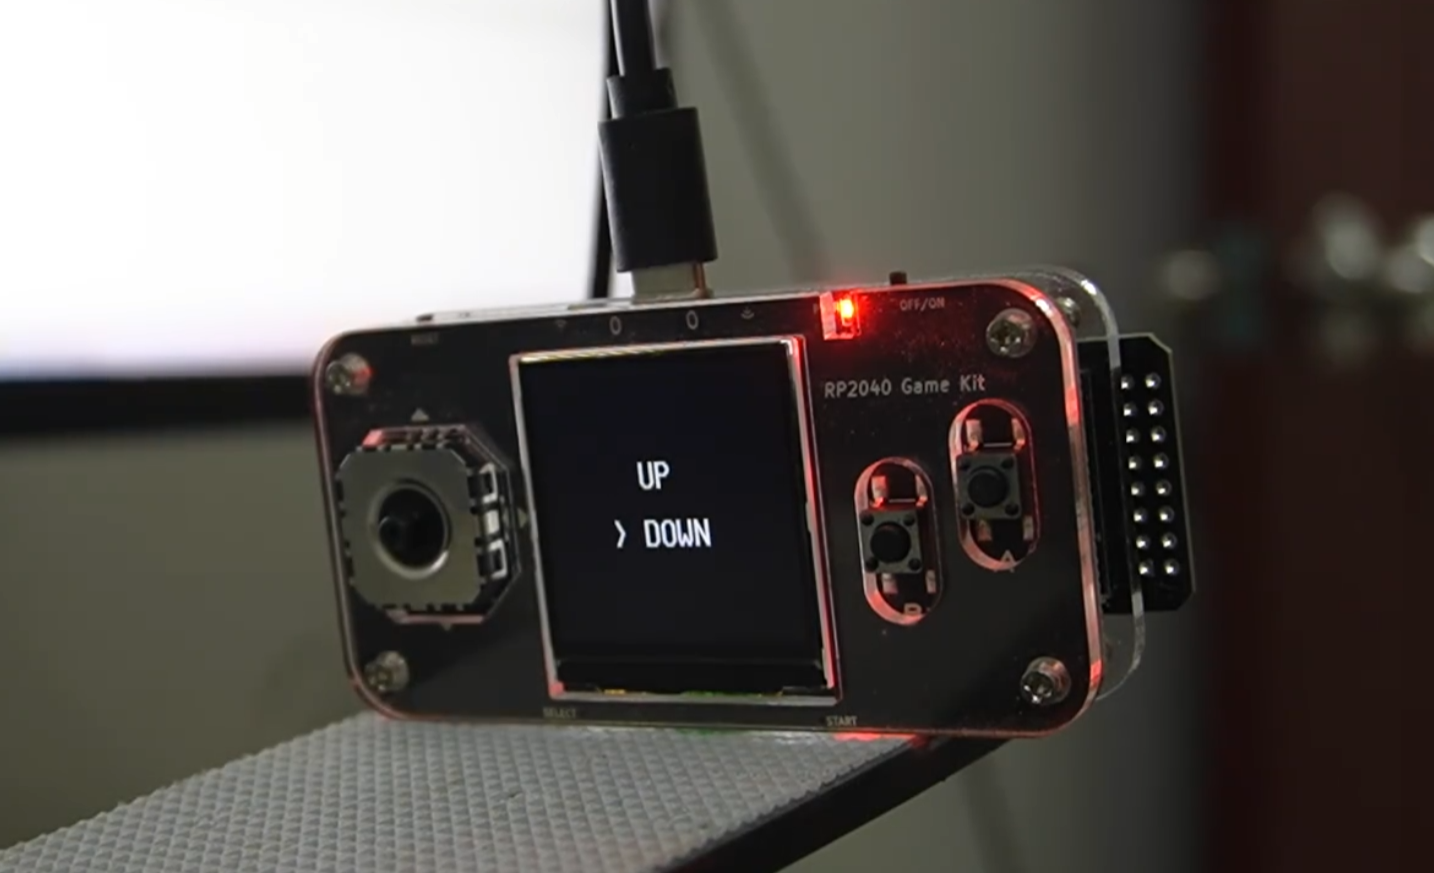
功能展示图
菜单上
菜单下
项目中遇到的难题和解决方法
其实对于手势的识别信息我更倾向的解决方法是使用ML的方式进行解决,但是数据的收集真的是一个非常麻烦的过程,在我对实际的数据进行收集的时候, 两个小时左右才总共收集了不到一千条数据。 而且数据的多样性也并不是很好,所以没办法避免程序欠拟合。 我相信如果有大量高质量的数据的话, 机器学习模型的正确率会远远的比使用差值判断的高的多。 而且还可以很好的处理上下移动时带来的左右移动,或者是左右移动的时候带来的上下移动。
对本次竞赛的心得体会
本次的竞赛对我来说意义深刻, 因为这次是我耗时最长的一次。它让我学习到了很多新的知识,比如说机器学习和TOF传感器的相关知识。 我希望我可以发现更多的场景来应用上这个TOF传感器,在这里也感谢电子森林和艾迈斯欧司朗的支持。谢谢!

 冷月烟
冷月烟